SEO businesses have specific requirements when it comes to proxies. Proxies play a crucial role in helping SEO professionals gather data, conduct market research, and perform various optimization tasks. Here are some of the key demands that SEO businesses have for PYproxies:1. Scalability: SEO businesses often require a large volume of proxies to handle their data scraping and analysis needs. Proxies should be able to scale according to the increasing demands of the business without compromising on performance or speed.2. Diverse Geographical Locations: To gather accurate and comprehensive data for SEO purposes, proxies with diverse geographical locations are essential. This allows businesses to view search engine results and website performance from different locations, ensuring that their SEO strategies are effective across various regions.3. High Anonymity and Security: Proxies used for SEO need to provide high levels of anonymity and security to protect the business's activities from being detected or blocked by search engines. This ensures that the data collection and analysis processes can be conducted without interference.4. Reliability and Speed: Proxies must offer reliable connections and high-speed performance to support the rapid retrieval of data for SEO analysis. Downtime and slow connections can hinder the efficiency of SEO tasks, so reliable and fast proxies are crucial for seamless operations.5. Customization Options: Businesses may require proxies that offer customization options such as rotating IP addresses, session control, or user agent rotation. These features allow SEO professionals to mimic human behavior and avoid being flagged as bots during data collection, contributing to more accurate results.6. Compliance with Search Engine Guidelines: Proxies used for SEO must adhere to search engine guidelines and policies to avoid any potential penalties or restrictions. It's essential for proxies to support ethical and compliant data collection practices to maintain the business's reputation and rankings.7. Cost-Effectiveness: While meeting all the above requirements, proxies should also be cost-effective for SEO businesses. The cost of acquiring and maintaining proxies should align with the business's budget without compromising on quality and performance.In conclusion, the demands of SEO businesses for proxies include scalability, diverse geographical locations, high anonymity and security, reliability and speed, customization options, compliance with search engine guidelines, and cost-effectiveness. By meeting these requirements, proxies can effectively support the data gathering and analysis needs of SEO professionals, contributing to successful strategies and improved search engine rankings.
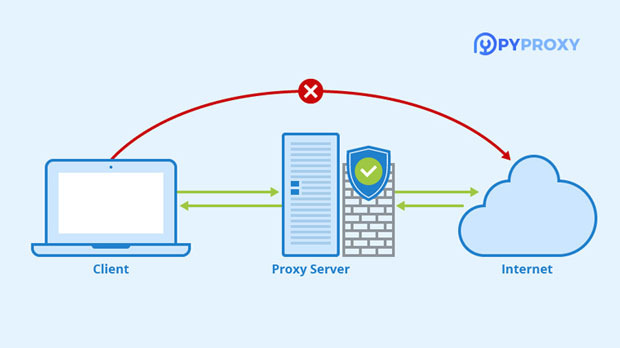
A transit server, also known as a proxy server, acts as an intermediary between clients and other servers. It plays a crucial role in managing and optimizing network traffic, enhancing security, and enabling access to restricted content. Let's delve into the various functions and benefits of a transit server.1. Network Traffic Management:Transit servers effectively manage network traffic by caching frequently accessed resources, compressing data, and load balancing. By caching commonly requested web pages, images, and files, transit servers reduce the load on origin servers and improve overall network performance. Additionally, they can compress data to minimize bandwidth usage and distribute incoming traffic across multiple servers for improved reliability and scalability.2. Security Enhancement:Transit servers provide an additional layer of security by acting as a barrier between clients and the internet. They can filter incoming and outgoing traffic, blocking malicious content, preventing unauthorized access, and mitigating distributed denial-of-service (DDoS) attacks. Furthermore, transit servers can enforce security policies and encrypt communications to safeguard sensitive data from potential threats.3. Content Filtering and Access Control:Transit servers enable organizations to enforce content filtering and access control policies. They can restrict access to specific websites or content categories based on predefined rules, ensuring compliance with regulatory requirements and maintaining productivity within the organization. Moreover, transit servers can authenticate users and apply granular access controls to manage permissions effectively.4. Anonymity and Privacy Protection:Transit servers facilitate anonymous browsing and protect user privacy by masking their IP addresses. This feature is particularly valuable for individuals seeking to bypass geo-restrictions, circumvent censorship, or maintain anonymity while browsing the internet. By routing traffic through a transit server, users can obscure their true location and identity, thus enhancing their online privacy.5. Bandwidth Optimization:Transit servers play a vital role in optimizing bandwidth usage within a network. By implementing caching mechanisms and content compression techniques, transit servers reduce the amount of data transmitted over the network, leading to improved efficiency and cost savings. This is especially beneficial for organizations with limited bandwidth resources or remote locations with constrained network connectivity.In conclusion, transit servers serve as versatile tools for optimizing network performance, enhancing security, and enabling controlled access to online resources. Whether deployed within corporate environments, educational institutions, or for personal use, transit servers play a pivotal role in facilitating efficient and secure communication over the internet.
In today's digital age, privacy and security are more important than ever. With the increasing number of cyber threats and online surveillance, it's crucial to take steps to protect your personal information. One effective way to enhance your online privacy is by blocking your IP address. Your IP address is like your digital fingerprint, and it can reveal a lot about you, including your location and browsing habits. Fortunately, there are several methods to block your IP address for free. In this article, we'll explore some of the most effective and accessible ways to do so.Use a Virtual Private Network (VPN)One of the most popular and reliable methods to block your IP address is by using a Virtual Private Network (VPN). A VPN encrypts your internet connection and routes it through a server in a location of your choice, effectively masking your IP address. There are many free VPN services available, although they may have limitations such as data caps and slower speeds. However, for basic browsing and light usage, a free VPN can provide a significant level of privacy and security.Use the Tor BrowserAnother option to block your IP address for free is by using the Tor browser. Tor is a free and open-source software that directs your internet traffic through a network of volunteer-operated servers, concealing your IP address and browsing activities. While the Tor network can be slower than a VPN due to its routing method, it offers a high level of anonymity and is particularly effective for accessing blocked or censored content.Use a Proxy ServerA proxy server acts as an intermediary between your device and the internet. By connecting to a proxy server, your IP address is masked, and the websites you visit only see the IP address of the proxy server. There are numerous free proxy services available, but it's essential to choose a reputable one to ensure your data remains secure. Keep in mind that some free proxy servers may display ads or collect user data, so it's crucial to read the terms of service before using them.Use Public Wi-FiWhile not as secure as the previous methods mentioned, using public Wi-Fi can temporarily mask your IP address. When you connect to a public Wi-Fi network, your internet traffic appears to originate from the network's IP address rather than your own. However, it's important to note that public Wi-Fi networks can pose security risks, as they are often targeted by hackers. Therefore, if you choose this method, it's advisable to use additional security measures such as a VPN or HTTPS-enabled websites.Protecting your online privacy is an ongoing effort, and blocking your IP address is a crucial step in safeguarding your personal information from prying eyes. While there are free methods available to achieve this, it's important to understand their limitations and potential risks. Whether you opt for a free VPN, the Tor browser, a proxy server, or public Wi-Fi, it's essential to prioritize security and choose reputable services. By taking proactive measures to block your IP address, you can enjoy a greater sense of privacy and anonymity while browsing the internet.
In this article, we will discuss how to change the IP and DNS settings for cellular data on various devices. Whether you are using a smartphone, tablet, or mobile hotspot, the process for changing these settings may vary slightly. We will cover the general steps for both Android and iOS devices, as well as provide some troubleshooting tips.Changing IP and DNS Settings on Android Devices:1. Open the Settings app on your Android device.2. Tap on "Network & internet" or "Connections" depending on your device.3. Select "Mobile network" or "Cellular networks."4. Tap on "Advanced" or "More" to access additional settings.5. Select "Access Point Names" or "APN" and choose the APN associated with your cellular network provider.6. Tap on the APN to edit its settings.7. Look for options to change the IP address type (IPv4 or IPv6) and the DNS settings.8. Make the necessary changes to the IP address and DNS fields.9. Save your changes and restart your device to apply the new settings.Changing IP and DNS Settings on iOS Devices:1. Open the Settings app on your iOS device.2. Tap on "Cellular" or "Mobile Data" depending on your device.3. Select "Cellular Data Network" to access the APN settings.4. Look for options to change the APN settings, including the IP address type and DNS settings.5. Make the necessary changes to the IP address and DNS fields.6. Save your changes and restart your device to apply the new settings.Troubleshooting Tips:If you encounter any issues when trying to change the IP and DNS settings for cellular data, consider the following troubleshooting tips:- Ensure that you have the correct APN settings for your cellular network provider. Contact your provider or visit their website to obtain the correct APN information.- Double-check the IP address and DNS settings to ensure they are entered correctly. A simple typo can cause connectivity issues.- Restart your device after making any changes to ensure that the new settings are applied properly.- If you are still experiencing issues, consider contacting your cellular network provider for further assistance.It's important to note that changing the IP and DNS settings for cellular data should be done with caution, as incorrect settings can lead to connectivity issues. Always double-check the information provided by your cellular network provider and follow any specific instructions they may have for changing these settings.In conclusion, changing the IP and DNS settings for cellular data on Android and iOS devices involves accessing the APN settings and making adjustments to the IP address and DNS fields. By following the steps outlined in this article and considering the troubleshooting tips provided, you can successfully update these settings to improve your cellular data connectivity. If you encounter any difficulties, don't hesitate to reach out to your cellular network provider for assistance.
Converting IP addresses is a common task in networking and cybersecurity. There are several methods to transform IP addresses, each serving a different purpose. In this blog post, we will discuss some of the most commonly used methods for converting IP addresses.1. Decimal to Binary Conversion:One of the most fundamental ways to convert an IP address is to convert it from decimal to binary. An IP address is a 32-bit number, typically expressed in dotted-decimal notation (e.g., 192.168.1.1). To convert an IP address from decimal to binary, each decimal octet is converted into its binary equivalent. For example, the IP address 192.168.1.1 would be converted to 11000000.10101000.00000001.00000001 in binary.2. Binary to Decimal Conversion:Conversely, it is also possible to convert an IP address from binary to decimal. This process involves taking each binary octet and converting it back into its decimal equivalent. For example, the binary IP address 11000000.10101000.00000001.00000001 would be converted to 192.168.1.1 in decimal notation.3. CIDR Notation:Classless Inter-Domain Routing (CIDR) notation is another method for representing IP addresses and their associated networks. CIDR notation combines the network address and the subnet mask into a single string of numbers, followed by a slash and a number indicating the number of significant bits in the subnet mask. For example, the IP address 192.168.1.1 with a subnet mask of 255.255.255.0 would be represented in CIDR notation as 192.168.1.0/24.4. IPv4 to IPv6 Conversion:With the exhaustion of available IPv4 addresses, the transition to IPv6 has become increasingly important. Converting an IPv4 address to IPv6 involves expanding the 32-bit IPv4 address into a 128-bit IPv6 address using a specific conversion algorithm. This process allows for the interoperability of IPv4 and IPv6 networks.5. Reverse DNS Lookup:Another method for converting IP addresses involves performing a reverse DNS lookup. This process allows you to retrieve the domain name associated with a given IP address. By querying the DNS system in reverse, you can obtain the domain name corresponding to a specific IP address.6. Geolocation:Geolocation is the process of converting an IP address into geographic coordinates, such as latitude and longitude. This method is commonly used for tracking the location of website visitors or identifying the origin of network traffic.There are several methods for converting IP addresses, each serving a different purpose in networking and cybersecurity. Whether it's converting between decimal and binary notation, representing addresses in CIDR notation, transitioning from IPv4 to IPv6, performing reverse DNS lookups, or geolocating IP addresses, these methods are essential for managing and securing network infrastructure.
In today's digital age, access to information and entertainment is crucial. Among the many online platforms, YouTube stands out as a global hub for videos of all kinds. However, due to various reasons such as geographical restrictions or internet censorship, users may find themselves unable to fully enjoy the content on YouTube. This is where proxies come into play.Proxies are intermediary servers that can help you bypass these restrictions by masking your IP address. By using a proxy server, you can Pretending to be from different locations around the world, thereby bypassing any blocks or filters that might be in place. This allows you to access even the most heavily restricted websites, including unblocked YouTube sites.But with so many proxies available, how do you choose the best one? Here are some tips:1.Research and Compare: Do your homework and compare different proxies based on their features, reliability, and user reviews. Look for proxies that have a good reputation and offer consistent performance.2.Test Before Committing: Before choosing a proxy, it's always a good idea to test it out first. Try accessing some known-to-be-blocked websites to see if the proxy works as advertised. This will give you a better idea of its effectiveness.3.Consider Anonymity: When using proxies, it's important to consider your anonymity. Choose a proxy provider that offers privacy features like encryption and ensures your data remains secure.4.Be Aware of Risks:While proxies can help you unblock websites, they also carry certain risks. For instance, using an unsecured proxy could expose your personal information. Therefore, make sure to only use trusted and secure proxy services.5.Stay Updated: The internet landscape is constantly changing, and so are the ways people try to block content. Keep yourself updated by checking for new proxy services or techniques that might arise over time.Remember, while proxies can provide temporary solutions to accessing blocked content, they should not be used as long-term strategies. It's always advisable to respect copyright laws and other regulations governing online activities in your region.In conclusion, using proxies can be a helpful tool when trying to find unblocked YouTube sites or other restricted content. Just make sure to exercise caution when choosing and utilizing these services to ensure both your safety and compliance with legal guidelines.
Minecraft, the immensely popular sandbox game, allows players to explore, build, and collaborate in a blocky world. One of its most engaging features is the ability to play on multiplayer servers. However, you may find yourself needing to change the server IP address for various reasons, such as switching to a new server, joining a friend's world, or reconnecting after a server reset. This article will guide you through the steps to change the server IP address in Minecraft, ensuring you can continue your adventures seamlessly.Understanding Minecraft ServersBefore diving into the specifics of changing the server IP address, it’s essential to understand what a Minecraft server is. A server is a dedicated environment where players can connect and interact in the same world. Each server has its unique IP address, which players must enter to join. Servers can host various game modes, including survival, creative, adventure, and mini-games, each offering different experiences.Reasons to Change Server IP Address1. Switching Servers: You may want to explore new worlds or experiences by connecting to a different server.2. Server Downtime: If a server is temporarily down for maintenance, you might need to connect to another server in the meantime.3. Friend's Invitation: A friend may invite you to join their server, requiring you to change the IP address.4. Server Migration: Sometimes, servers change their IP addresses due to upgrades or changes in hosting.How to Change the Server IP Address in MinecraftChanging the server IP address in Minecraft is a straightforward process. Below are the detailed steps for both the Java Edition and the Bedrock Edition.Changing the Server IP in Minecraft Java Edition1. Launch Minecraft:- Open the Minecraft launcher and select the Java Edition.2. Go to the Multiplayer Menu:- From the main menu, click on Multiplayer. This will take you to the list of servers you have previously added.3. Add a New Server:- Click on the Add Server button. This option allows you to enter the details of a new server.4. Enter Server Details:- In the Server Name field, type any name you want to give to the server. This is for your reference and can be anything you like.- In the Server Address field, enter the new server IP address. This can be an IP address (e.g., `192.168.1.1`) or a domain name (e.g., `play.example.com`).5. Save the Server:- After entering the server details, click on the Done button. This will save the server to your list.6. Join the Server:- You should now see the newly added server in your list. Click on it to highlight it, and then click on the Join Server button to connect.Changing the Server IP in Minecraft Bedrock EditionFor players using the Bedrock Edition of Minecraft, the process is slightly different:1. Launch Minecraft:- Open the Minecraft app on your device (Windows 10, Xbox, PlayStation, or mobile).2. Go to the Play Menu:- From the main menu, click on Play to access your worlds and servers.3. Select the Servers Tab:- Navigate to the Servers tab at the top of the screen. This section shows a list of available servers.4. Add a New Server:- Scroll down to the bottom of the server list and click on Add Server.5. Enter Server Information:- In the Server Name field, type a name for the server.- In the Server Address field, enter the new server IP address. Ensure you enter it correctly to avoid connection issues.- Specify the Port if necessary (the default port for Minecraft is `19132` for Bedrock Edition).6. Save and Join the Server:- Click on Save to add the server to your list. You can now click on the server name to join it.Troubleshooting Common Connection IssuesSometimes, players may encounter issues when trying to connect to a new server. Here are some common problems and solutions:1. Invalid Server IP Address- Check for Typos: Ensure that you entered the server IP address correctly. Even a small typo can prevent you from connecting.- Server Status: Verify that the server is online and not undergoing maintenance.2. Connection Timed Out- Server Capacity: The server may be full. Try connecting at a different time when fewer players are online.- Firewall Settings: Ensure that your firewall settings are not blocking Minecraft. You may need to allow the game through your firewall.3. Outdated Client Version- Version Compatibility: Ensure that your version of Minecraft matches the server version. If the server is running a different version, you may need to update or downgrade your game.4. Network Issues- Internet Connection: Check your internet connection to ensure it’s stable. Restart your router if necessary.- VPN or Proxy: If you are using a VPN or proxy, try disabling it, as it may interfere with your connection to the server.Tips for Finding New ServersIf you’re looking to explore new servers, here are some tips:1. Online Server Lists: Websites like `Minecraft Server List` or `Planet Minecraft` provide extensive lists of servers categorized by game mode, popularity, and player reviews.2. Community Forums: Engage with the Minecraft community on forums or social media platforms to discover recommendations for good servers.3. YouTube and Twitch: Many content creators showcase their favorite servers. Watching gameplay can give you a feel for the server's community and style.ConclusionChanging the server IP address in Minecraft is a simple process that opens up a world of possibilities for exploration and collaboration. Whether you’re joining a friend’s server or discovering new communities, knowing how to modify the server settings is essential for any avid Minecraft player. By following the steps outlined in this article and troubleshooting common issues, you can ensure a seamless gaming experience. So go ahead, change that IP address, and dive back into the blocky adventures that await you!
In Grand Theft Auto 5 (GTA5), players often need to access in-game network functions through a browser, such as purchasing items, viewing game information, etc. However, sometimes for privacy protection or access restrictions, players may want to access these functions through a proxy IP. This article will detail how to set up a browser proxy IP in GTA5 to help players optimize their gaming experience.1. What is a proxy IP?A proxy IP is an intermediary server through which users access the Internet. When players use a proxy IP, the target website can only see the IP address of the proxy server, but cannot obtain the user's real IP. This method can improve privacy protection, bypass geographical restrictions, and even speed up access.2. Why use a proxy IP in GTA5?There are several obvious benefits of using a proxy IP in GTA5:- Privacy protection: Through a proxy IP, players can hide their real IP address and protect their personal privacy.- Bypassing geographical restrictions: Players in certain regions may not be able to access specific game content or services, and using a proxy IP can help them bypass these restrictions.- Increase speed: In some cases, a proxy IP can provide a faster connection speed and improve the gaming experience.3. How to set the browser proxy IPIn GTA5, the browser proxy settings are usually implemented through the operating system's network settings. Here are the detailed steps:3.1 Get proxy IP informationBefore setting, you first need to obtain a valid proxy IP address. You can get it in the following ways:- Purchase proxy service: Many online service providers provide high-quality proxy IPs to ensure speed and stability.- Use free proxy: Although there are many free proxies available, they are usually not stable enough and may pose security risks.3.2 Set up a proxy in Windows system1. Open Settings: Click the "Start" menu and select "Settings".2. Network and Internet: In the Settings window, select "Network and Internet".3. Proxy: Find and click "Proxy" in the menu on the left.4. Manually set up the proxy:- Turn on "Use manual proxy settings" and switch it to "On".- Enter the IP address of the proxy server in the "Address" field and the corresponding port number in the "Port" field.- Click "Save".3.3 Setting up a proxy on a Mac1. Open System Preferences: Click the Apple menu and select "System Preferences".2. Network: Select the "Network" option.3. Select a network connection: Select the network connection you are using (such as Wi-Fi or Ethernet) on the left.4. Advanced Settings: Click the "Advanced" button in the lower right corner.5. Proxy: Select the "Proxy" option in the top menu.6. Manual Configuration:- Check "HTTP Proxy" or "HTTPS Proxy", then enter the IP address and port number of the proxy server.- Click "OK" and save the settings.4. Test the proxy settings in GTA5After completing the proxy settings, you can test it through the browser in GTA5:1. Launch GTA5: Open the game and enter online mode.2. Open the in-game browser: Press the corresponding button to open the in-game web browser.3. Visit a website: Try to visit a website and check if it can load normally.If the webpage can load normally, it means that the proxy settings are successful. If you encounter problems, you can check whether the proxy settings are correct, or try to change other proxy IPs.5. Common problems and solutions5.1 Proxy IP cannot connectIf you cannot connect to the proxy IP in GTA5, it may be due to the following reasons:- Proxy IP invalid: Make sure the proxy IP used is valid, which can be verified through online tools.- Network setting error: Check whether the proxy settings of the operating system are correct.5.2 Slow speedWhen using a proxy IP, if the speed is slow, you can try the following methods:- Change proxy: Choose a faster proxy IP.- Use a paid proxy: Paid proxies are usually more stable and faster than free proxies.5.3 Access restrictionsSome websites may restrict access to proxy users. To avoid this, you can try to use a highly anonymous proxy, which will not reveal the user's real IP to the target website.Setting a browser proxy IP in GTA5 can effectively protect privacy, bypass geographical restrictions and increase access speed. Players can easily achieve this goal through the correct setting steps and methods. I hope this article can help you better use the proxy IP in GTA5 and improve your gaming experience. If you encounter problems during the setting process, please feel free to refer to relevant information or seek help.
Are you tired of getting blocked or banned when trying to access certain websites or online services? Whether you're a business professional, a data analyst, or just an avid internet user, dealing with IP blocks and restrictions can be frustrating and time-consuming. That's where residential proxy providers come in.What are residential proxies?Residential proxies are IP addresses provided by Internet Service Providers (ISPs) to homeowners. When you use a residential proxy, your web requests appear to come from a real residential IP address, making it look like a regular internet user is accessing the website. This makes residential proxies much more difficult for websites to detect and block compared to data center proxies.Residential proxies are widely used for web scraping, ad verification, social media management, and other online activities that require a high level of anonymity and reliability. With a residential proxy, you can access websites and collect data without being blocked or banned.Choosing the right residential proxy providerWhen it comes to choosing a residential proxy provider, there are several factors to consider:1. Proxy pool size: A larger proxy pool means more IP addresses to rotate through, reducing the likelihood of being blocked.2. Geographical coverage: Depending on your needs, you may require proxies from specific locations or countries.3. Reliability and speed: Look for a provider with a high uptime guarantee and fast proxy speeds.4. Customer support: A responsive and knowledgeable customer support team can make a big difference when troubleshooting issues or setting up your proxies.5. Pricing: Consider the cost of the service and whether it fits within your budget.Residential proxies are an essential tool for anyone who needs to access the internet anonymously and reliably. By choosing the right residential proxy provider, you can avoid IP blocks and restrictions while maintaining a high level of anonymity and security. Consider the factors mentioned above and explore the top providers to find the best fit for your specific needs. With the right residential proxy provider, you can access the web with confidence and peace of mind.
Have you ever experienced the frustration of being blocked from accessing a website because your IP address has been temporarily banned? It can be a real headache, especially if you rely on that website for work or entertainment. But fear not, there are several techniques you can try to get around this obstacle. In this blog post, we will discuss 10 tips to help you unblock your IP address and regain access to the websites you need.1. Check for the ReasonThe first step in unblocking your IP address is to understand why it was blocked in the first place. Sometimes, it could be due to suspicious activity from your IP address, such as multiple failed login attempts or spamming. In other cases, it could be a mistake on the website's end. By understanding the reason for the block, you can take appropriate action to resolve the issue.2. Contact the Website AdministratorIf you believe that your IP address has been blocked unfairly, it's worth reaching out to the website administrator to explain your situation. Provide them with any relevant information or evidence to support your case. Be polite and respectful in your communication, as this will increase the likelihood of a positive outcome.3. Use a Virtual Private Network (VPN)A VPN is a popular tool for bypassing IP blocks. By connecting to a VPN server, you can mask your original IP address and obtain a new one from the VPN provider. This allows you to access the blocked website as if you were located in a different location.4. Restart Your RouterIn some cases, simply restarting your router can result in a new IP address being assigned to your device. This can be an effective way to bypass an IP block, especially if the block is based on a specific IP address.5. Use a Proxy ServerSimilar to a VPN, a proxy server can help you bypass IP blocks by providing an alternative IP address for accessing the blocked website. There are many free proxy services available, but be cautious when using them to ensure your privacy and security.6. Clear Your Browser Cookies and CacheSometimes, website blocks are based on cookies or cached data stored in your browser. By clearing these files, you can effectively reset your browsing session and potentially bypass the IP block.7. Switch to Mobile DataIf you're accessing the website from a mobile device, switching to mobile data instead of Wi-Fi can give you a new IP address and bypass the block. However, keep in mind that this may result in additional data charges from your mobile service provider.8. Use Tor BrowserThe Tor browser is designed to provide anonymous and secure browsing by routing your internet traffic through multiple servers. It can be an effective tool for bypassing IP blocks and accessing blocked websites.9. Contact Your Internet Service Provider (ISP)If you suspect that your IP address has been blocked due to an issue with your internet service provider, it's worth contacting them to investigate the issue. They may be able to assign you a new IP address or resolve any underlying issues causing the block.10. Wait It OutIn some cases, the best course of action is simply to wait for the temporary block to expire. This is often the case with dynamic IP addresses that are periodically reassigned by ISPs. Once the block is lifted, you should be able to access the website again without any issues.Being temporarily blocked from accessing a website due to your IP address can be frustrating, but it's not the end of the road. By following these 10 tips, you can increase your chances of unblocking your IP address and regaining access to the websites you need. Remember to always use these techniques responsibly and respect the policies of the websites you visit. Good luck!