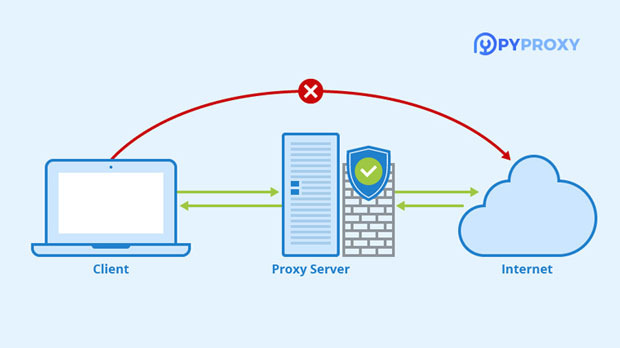
Mobile devices have become essential tools for accessing the internet, and setting up a Socks5 proxy server on a mobile device can enhance privacy and security. This article will guide you through the process of setting up a Socks5 proxy server on your mobile device, ensuring you can access the internet securely.Understanding Socks5 ProxySocks5 is the latest version of the Socks protocol, allowing users to route their internet traffic through a proxy server. It supports various protocols, including TCP and UDP, making it suitable for a wide range of applications. By using a Socks5 proxy, users can mask their IP addresses, bypass geo-restrictions, and secure their internet connections.PrerequisitesBefore setting up a Socks5 proxy server on your mobile device, you will need:A VPS with a Linux operating system (preferably Ubuntu).Basic command-line skills.A mobile device (iOS or Android).Installing the Socks5 Proxy Server on VPSYou will first need to set up the Socks5 proxy server on a VPS. Follow these steps:1. Connect to Your VPS: Use SSH to connect to your VPS.ssh root@your_vps_ip2. Update the Package List:sudo apt update3. Install Python and Pip:sudo apt install python3 python3-pip4. Install Shadowsocks:pip3 install shadowsocks5. Create a Configuration File:sudo nano /etc/shadowsocks.jsonExample configuration:{"server": "0.0.0.0","port_password": {"1080": "your_password"},"timeout": 300,"method": "aes-256-gcm","fast_open": true}6. Start the Proxy Server:sudo ssserver -c /etc/shadowsocks.json -d startConfiguring Your Mobile DeviceOnce the Socks5 proxy server is running, configure your mobile device to use it:For Android:Open Settings: Go to your device's settings.Network & Internet: Tap on "Network & Internet" and select "VPN."Add VPN: Tap on "Add VPN" and enter the required details:Name: Choose a name for your VPN.Type: Select "Socks5."Server address: Enter your VPS IP address.Port: Enter the port number (e.g., 1080).Username and Password: Enter the credentials if required.Save and Connect: Save the configuration and connect to the VPN.For iOS:Open Settings: Go to your device's settings.Wi-Fi: Tap on "Wi-Fi" and select your connected network.Configure Proxy: Scroll down to "HTTP Proxy" and select "Manual."Enter Proxy Details:Server: Input the IP address of your Socks5 proxy server.Port: Enter the port number (default is usually 1080).Authentication: If required, toggle the option and enter your username and password.Save Changes: Exit the settings, and your device will now use the Socks5 proxy.Testing the Proxy ConnectionTo verify that your Socks5 proxy is functioning correctly, you can use a web browser or an app that allows you to check your IP address. If the IP address shown is that of your proxy server, the setup is successful.ConclusionSetting up a Socks5 proxy server on your mobile device can significantly enhance your online privacy and security. By following the steps outlined in this article, you can effectively configure your mobile device to use a Socks5 proxy, allowing for a more secure browsing experience. As online threats continue to evolve, taking proactive measures to protect your privacy is essential.
Residential proxies have become indispensable tools for e-commerce businesses seeking to gain a competitive edge, optimize operations, and enhance customer experiences in the dynamic online marketplace. In this article, we delve into the functionalities, advantages, and practical applications of residential proxies in e-commerce, exploring how these tools can revolutionize online retail strategies and drive business growth.Understanding Residential Proxies in E-Commerce:Residential proxies are IP addresses assigned by Internet Service Providers (ISPs) to homeowners, mimicking genuine user activity and providing e-commerce businesses with a pool of diverse and legitimate IP addresses to navigate the digital landscape. By routing web traffic through residential proxies, e-commerce platforms can access localized content, automate tasks, conduct market research, and protect against fraud and security threats effectively.Key Features of Residential Proxies for E-Commerce:Geographic Targeting: Residential proxies enable e-commerce businesses to target specific geographic regions, access region-specific content, and tailor marketing campaigns to local audiences.Anonymity and Security: By masking the true IP address of users, residential proxies provide anonymity, protect against cyber threats, and prevent tracking and monitoring by third parties.Scalability: Residential proxies offer scalable solutions for handling web scraping, price monitoring, ad verification, and other data-intensive tasks crucial for e-commerce operations.Benefits of Using Residential Proxies in E-Commerce:Price Monitoring and Competitor Analysis: Residential proxies facilitate price monitoring by collecting real-time data on competitor pricing strategies, product availability, and market trends. By leveraging residential proxies, e-commerce businesses can gain actionable insights, adjust pricing strategies dynamically, and stay ahead of the competition.Ad Verification and Fraud Prevention: Residential proxies play a vital role in ad verification efforts by simulating user interactions with online ads, verifying ad placements, and detecting fraudulent activities such as ad fraud and click fraud. E-commerce platforms can ensure ad transparency, optimize ad campaigns, and mitigate the risks of advertising fraud with residential proxies.Data Scraping and Market Research: Residential proxies enable automated data scraping for market research, trend analysis, and consumer behavior insights. By collecting and analyzing data from diverse sources, e-commerce businesses can make informed decisions, identify emerging opportunities, and optimize product offerings based on market demands.In conclusion, residential proxies offer e-commerce businesses a powerful toolset to optimize operations, enhance data intelligence, and drive business growth in the competitive online marketplace. By leveraging the functionalities and benefits of residential proxies, e-commerce platforms can gain a competitive edge, improve decision-making processes, and deliver personalized experiences that resonate with customers in the ever-evolving digital landscape.
In today's digital age, privacy and security are of utmost importance. With the increasing concerns about online privacy, many people are looking for ways to hide their IP addresses. Whether it's to protect themselves from potential cyber threats or simply to maintain their anonymity online, hiding your IP address can be a crucial step in safeguarding your online presence.If you're an Apple iPhone user and you're looking for ways to hide your IP address for free, you're in the right place. In this article, we'll explore some methods that you can use to conceal your IP address while using your iPhone, without having to spend a single dime.1. Use a VPN (Virtual Private Network)One of the most effective and popular ways to hide your IP address is by using a VPN. A VPN is a service that allows you to create a secure connection to another network over the internet. By using a VPN, your IP address is masked and replaced with the IP address of the VPN server, thereby hiding your true IP address from prying eyes.There are several free VPN apps available on the App Store that you can download and use on your iPhone. While free VPNs may have some limitations compared to their paid counterparts, they can still provide a basic level of anonymity and security for casual users.2. Tor BrowserThe Tor browser is another tool that can help you hide your IP address for free. Tor is a free and open-source software that directs internet traffic through a free, worldwide, volunteer overlay network consisting of more than seven thousand relays to conceal a user's location and usage from anyone conducting network surveillance or traffic analysis.By using the Tor browser on your iPhone, you can browse the internet anonymously and access websites without revealing your true IP address. It's important to note that while Tor can provide a high level of anonymity, it may also slow down your internet connection due to the nature of its network routing.3. Proxy ServersUsing a proxy server is another method to hide your IP address for free. A proxy server acts as an intermediary between your device and the internet. When you use a proxy server, your requests are processed through the proxy server, and the websites you visit will see the IP address of the proxy server instead of your actual IP address.There are free proxy apps available on the App Store that you can use to route your internet traffic through a proxy server, thereby concealing your IP address. While using a proxy server can provide a certain level of anonymity, it's important to choose a reputable and trustworthy proxy service to ensure your privacy and security.4. Public Wi-Fi NetworksAnother way to hide your IP address for free is by using public Wi-Fi networks. When you connect to a public Wi-Fi network, your IP address is masked by the IP address of the public network. This can provide a basic level of anonymity, especially if you're using the internet for casual browsing or accessing non-sensitive information.However, it's important to exercise caution when using public Wi-Fi networks, as they may not always be secure and could expose you to potential security risks such as man-in-the-middle attacks or data interception.In conclusion, hiding your IP address on your Apple iPhone for free is indeed possible through various methods such as using a VPN, Tor browser, proxy servers, or public Wi-Fi networks. While these methods can provide a certain level of anonymity and security, it's important to remember that no solution is foolproof, and it's always advisable to exercise caution and use additional security measures when browsing the internet. By implementing these methods, you can take proactive steps towards safeguarding your online privacy and maintaining control over your digital footprint.
In today's digital age, residential networks have become an integral part of our daily lives. From streaming movies and TV shows to working remotely and accessing cloud services, our homes are increasingly becoming hubs of network activity. However, one challenge that often arises is accessing these networks when they utilize dynamic IP addresses. This article will explore the concept of dynamic IP addresses, their implications for residential networks, and strategies for effectively accessing and managing them.Understanding Dynamic IP AddressesA dynamic IP address is an IP address that is temporarily assigned to a device by a network's DHCP (Dynamic Host Configuration Protocol) server. In contrast to a static IP address, which remains constant, a dynamic IP address can change over time, depending on the network's configuration and the availability of IP addresses.In residential networks, dynamic IP addresses are typically used to simplify network management and conserve IP address space. By allowing devices to automatically obtain an IP address from the DHCP server, users don't have to manually configure each device's network settings.Challenges of Accessing Residential Networks with Dynamic IP AddressesWhile dynamic IP addresses offer convenience and flexibility, they also introduce some challenges when it comes to accessing and managing residential networks. Here are some of the key issues:1.Changing IP Addresses: Since dynamic IP addresses can change, it becomes difficult to consistently access devices or services on the network using their IP addresses. This can be problematic for remote access, file sharing, or streaming media.2.Security Concerns: With changing IP addresses, it becomes more challenging to implement robust security measures, such as firewall rules or access controls, that rely on specific IP addresses.3.Network Management: Dynamic IP addresses can make network management more complex, as administrators need to keep track of which devices are assigned which IP addresses at any given time.Strategies for Accessing Residential Networks with Dynamic IP AddressesDespite these challenges, there are several strategies that can help you effectively access and manage your residential network with dynamic IP addresses:1.Use a Domain Name System (DNS): Instead of relying on IP addresses, you can set up a DNS server or use a public DNS service to map domain names to your network's devices. This allows you to access devices using easy-to-remember domain names, regardless of their dynamic IP addresses.2.Employ Dynamic DNS (DDNS): Dynamic DNS services, such as DynDNS or No-IP, can automatically update DNS records whenever a device's IP address changes. This ensures that you can always access your devices using their domain names, even if their IP addresses change.3.Use a VPN (Virtual Private Network): Setting up a VPN on your residential network allows you to securely access your home network from anywhere in the world. VPNs establish a private, encrypted connection between your device and your home network, bypassing the need to know specific IP addresses.4.Utilize Port Forwarding: If you need to access a specific service on your network, such as a web server or game server, you can configure your router to forward incoming traffic on a specific port to the device with the desired service. This allows you to access the service using the router's public IP address and the specified port, regardless of the device's dynamic IP address.5.Monitor and Manage Your Network: Using network monitoring tools and software, you can keep track of your network's devices, IP addresses, and traffic patterns. This information can help you identify and troubleshoot any issues related to dynamic IP addresses and improve your network's overall performance and security.In conclusion, accessing residential networks with dynamic IP addresses can be challenging but not impossible. By understanding the nature of dynamic IP addresses and employing strategies such as DNS, DDNS, VPNs, port forwarding, and network monitoring, you can effectively access and manage your home network while leveraging the convenience and flexibility of dynamic IP addresses.
In the digital age, anonymity and privacy have become paramount concerns for individuals and businesses alike. One of the most effective tools for safeguarding these valuable assets is the utilization of virtual browser proxies. By routing your online activity through a proxy server, you can conceal your true IP address, enabling secure and anonymous browsing experiences. This comprehensive guide delves into the intricacies of virtual browser proxy settings, exploring their significance, types, setup process, benefits, and best practices.Introduction to Virtual Browser ProxiesA virtual browser proxy is a combination of advanced browser technology and proxy server capabilities, designed to provide a secure and isolated environment for web browsing. Unlike traditional browsers, which often expose your browsing history, cookies, and other identifying information, virtual browsers with proxy settings create a disposable, ephemeral browsing session where all data is encrypted and routed through an intermediary server. This setup is particularly useful for tasks such as web scraping, market research, price comparison, and accessing geo-restricted content.Types of Virtual Browser ProxiesData Center Proxies: These proxies are hosted in dedicated servers within data centers, offering high-speed connectivity and scalability. While they are cost-effective, they may not always provide the same level of anonymity as residential proxies due to their distinct IP address ranges.Residential Proxies: Residential proxies mimic the behavior of real users by utilizing IP addresses assigned to actual homes or internet service providers. They offer a higher degree of anonymity and are less likely to trigger CAPTCHAs or be blocked by target websites.Mobile Proxies: As the name suggests, mobile proxies emulate mobile device connections, allowing you to access websites and services that might otherwise be inaccessible from desktop environments. They're ideal for testing mobile-specific functionalities and conducting market research.Setting Up Virtual Browser ProxiesStep 1: Choose a Reliable Proxy ProviderSelect a proxy provider that offers a wide range of IPs, high availability, and robust security features. Look for providers that offer both residential and data center proxies, depending on your specific needs.Step 2: Configure Your Virtual BrowserUsing Browser Extensions: Some proxy providers offer browser extensions that simplify the setup process. Install the extension, log in with your proxy provider credentials, and select the desired proxy location.Manual Configuration: For more advanced users, you can manually configure your browser's proxy settings. Navigate to your browser's settings, find the "Network" or "Proxy" section, and enter the IP address and port number provided by your proxy provider.Virtual Machine or Container: For even higher levels of isolation, consider using a virtual machine (VM) or container with a dedicated IP from your proxy provider. This approach ensures that no traces of your browsing session remain on your main system.Step 3: Verify Your SetupAfter configuring your virtual browser with proxy settings, visit websites that display your IP address to verify that your connection is indeed being routed through the proxy server. You can also check the HTTP headers for any identifying information that might have been inadvertently leaked.Benefits of Using Virtual Browser ProxiesEnhanced Privacy: Your true IP address is concealed, making it difficult for third parties to track your online activities.Bypass Geo-Restrictions: Access content and services that are typically unavailable in your location.Increased Security: By hiding your identity, you reduce the risk of targeted cyber attacks.Data Scraping: Perform large-scale data extraction without triggering CAPTCHAs or being banned by target websites.Market Research: Simulate user behavior from different locations to gain insights into regional trends and preferences.Best PracticesRotate Proxies: Regularly change your proxy IPs to avoid being flagged as suspicious activity by websites.Respect Privacy Policies: Always ensure that your use of proxies complies with the terms of service and privacy policies of the websites you visit.Monitor Performance: Keep an eye on connection speeds and availability to ensure seamless browsing experiences.Stay Updated: Stay informed about the latest proxy technologies and security threats to maintain the effectiveness of your setup.In conclusion, mastering virtual browser proxy settings is a vital skill for anyone seeking to navigate the web with enhanced privacy, security, and flexibility. By understanding the different types of proxies, following the setup process meticulously, and adhering to best practices, you can unlock a world of possibilities on the internet while keeping your digital footprint minimal.
Using a Socks5 proxy on your Android device can significantly enhance your online privacy and security. This article will guide you through the process of configuring and using a Socks5 proxy on your Android device, ensuring you can browse the internet securely and anonymously.Understanding Socks5 ProxySocks5 is a versatile proxy protocol that allows users to route their internet traffic through a proxy server. It supports both TCP and UDP protocols, making it suitable for various applications, including web browsing, gaming, and file sharing. By using a Socks5 proxy, users can mask their IP addresses and bypass geographical restrictions.PrerequisitesBefore you begin, ensure you have the following:A Socks5 proxy server (either set up on a VPS or obtained from a reliable provider).Your Android device.Basic knowledge of navigating Android settings.Configuring the Socks5 Proxy on AndroidOpen Settings: Tap on the "Settings" app on your Android device.Network & Internet: Select "Network & Internet," then tap on "VPN."Add VPN: Tap on "Add VPN" or the "+" icon to create a new VPN profile.Enter VPN Details:Name: Choose a name for your VPN connection.Type: Select "Socks5" as the type.Server: Enter the IP address of your Socks5 proxy server.Port: Enter the port number (default is usually 1080).Username and Password: If your proxy requires authentication, enter your credentials.Save and Connect: After entering all the details, save the configuration. Tap on the VPN profile to connect.Testing the Socks5 ProxyTo ensure that your Socks5 proxy is functioning correctly, you can use a web browser or a dedicated app to check your IP address. If the IP displayed is that of your proxy server, your setup is successful.Benefits of Using Socks5 on AndroidEnhanced Privacy: By routing your traffic through a Socks5 proxy, you can mask your IP address, making it difficult for websites to track your online activities.Bypass Geo-Restrictions: Access content that may be restricted in your geographical location, such as streaming services or websites.Improved Security: Socks5 proxies can encrypt your internet traffic, adding an extra layer of security, especially when using public Wi-Fi networks.Common Issues and TroubleshootingConnection Problems: If you cannot connect, double-check your proxy settings, including the IP address and port number.Slow Internet Speeds: Using a proxy can sometimes slow down your connection. Consider trying a different proxy server or checking your internet speed.Authentication Errors: Ensure that your username and password are entered correctly if authentication is required.ConclusionUsing a Socks5 proxy on your Android device can significantly enhance your online privacy and security. By following the steps outlined in this article, you can easily configure your device to use a Socks5 proxy, allowing for a more secure browsing experience. As online threats continue to evolve, taking proactive measures to protect your privacy is essential.
In the fast-paced world of e-commerce, data security, user privacy, and fraud prevention are paramount concerns for businesses and consumers alike. Residential proxies emerge as essential tools that safeguard online transactions, protect sensitive information, and ensure secure browsing experiences in the digital realm. This article delves into the significance of residential proxies in e-commerce, highlighting their role in enhancing security, preserving anonymity, and fostering trust in online retail environments.Ensuring Secure Transactions with Residential Proxies:Residential proxies play a crucial role in securing online transactions by encrypting data transmissions, masking IP addresses, and establishing secure connections between users and e-commerce platforms. By routing web traffic through residential proxies, e-commerce businesses can mitigate the risks of data breaches, phishing attacks, and identity theft, ensuring the confidentiality and integrity of sensitive information shared during transactions.Key Security Features of Residential Proxies:SSL/TLS Encryption: Residential proxies support encryption protocols such as SSL/TLS to secure data transmissions, protect against interception, and prevent unauthorized access to sensitive information.IP Masking: By masking users' true IP addresses with residential IPs, proxies provide anonymity and prevent tracking by malicious actors, enhancing privacy and security during online transactions.Firewall Protection: Residential proxies offer firewall capabilities to filter incoming and outgoing traffic, block malicious requests, and defend against cyber threats, ensuring a secure browsing environment for e-commerce activities.Preserving User Anonymity and Privacy:In the age of data privacy concerns and increasing regulatory scrutiny, maintaining user anonymity and privacy has become a top priority for e-commerce platforms. Residential proxies empower users to browse the internet anonymously, access geo-restricted content, and protect their digital identities from surveillance and tracking, fostering trust and confidence in online transactions.Benefits of User Anonymity with Residential Proxies:Protection Against Tracking: Residential proxies shield users' online activities from tracking technologies, cookies, and data collection practices employed by websites and advertisers, preserving user anonymity and preventing targeted advertising.Geo-Spoofing Capabilities: By leveraging residential proxies with geolocation features, users can access region-restricted content, bypass geo-blocks, and experience unrestricted browsing, enhancing online accessibility and content availability.Identity Protection: Residential proxies enable users to mask their real IP addresses, prevent identity disclosure, and safeguard personal information from cyber threats, identity theft, and online fraud, ensuring a secure and private browsing experience.In conclusion, residential proxies play a crucial role in enhancing security, preserving anonymity, and fostering trust in e-commerce transactions by ensuring secure data transmissions, protecting user privacy, and mitigating fraud risks. By leveraging the capabilities and benefits of residential proxies, e-commerce platforms can build a secure and reliable online shopping environment that prioritizes user trust, data protection, and seamless customer experiences in today's evolving digital landscape.
Are you looking to change the name of a proxy server in Chrome? Whether you want to update the name for organizational purposes or simply to keep things organized, it's a relatively simple process. In this guide, we'll walk you through the steps to change the proxy server settings name in Chrome.Step 1: Open Chrome SettingsFirst, open Google Chrome on your computer. Then, click on the three-dot menu icon in the top-right corner of the browser window. From the drop-down menu, select "Settings."Step 2: Access Proxy SettingsIn the Settings menu, scroll down and click on "Advanced" to expand the advanced settings options. Then, under the "System" section, click on "Open your computer's proxy settings."Step 3: Open Proxy SettingsClicking on "Open your computer's proxy settings" will take you to your system's network settings. Here, you can manage various network configurations, including proxy settings.Step 4: Change Proxy Server NameIn the proxy settings window, look for the specific proxy server for which you want to change the name. Click on the server to select it, then click on the "Edit" or "Properties" button, depending on your operating system.Step 5: Update NameOnce you've opened the properties or editing window for the selected proxy server, you should see an option to change the name. Simply enter the new name you'd like to use for the proxy server and click "Save" or "OK" to apply the changes.Step 6: Verify ChangesAfter updating the name of the proxy server, it's a good idea to verify that the changes have been applied successfully. You can do this by returning to Chrome and checking the proxy settings within the browser.Step 7: Test ConnectivityFinally, after changing the proxy server name, it's important to test your network connectivity to ensure that everything is working as expected. Open a few websites in Chrome to confirm that your internet connection is functioning properly with the updated proxy server name.Changing the name of a proxy server in Chrome is a straightforward process that can help you keep your network configurations organized and easy to manage. By following these steps, you can update the name of a proxy server to better suit your needs and preferences. If you have multiple proxy servers configured, you can repeat these steps for each server to ensure that they are properly labeled and identified within your network settings.We hope this guide has been helpful in assisting you with changing the proxy server settings name in Chrome. If you have any further questions or need additional assistance, feel free to reach out to our support team for further guidance. Thank you for reading!
MySQL Proxy is a lightweight middleware that sits between the client and the MySQL server, allowing you to intercept, inspect, and modify the communication between them. It's often used for load balancing, query filtering, or as a gateway for security and access control. Here's a guide on how to configure MySQL Proxy for basic usage.1. Installing MySQL ProxyBefore you can configure MySQL Proxy, you need to have it installed on your system. The installation process varies depending on your operating system. For Linux distributions, you can often find MySQL Proxy in the package repositories or download it from the MySQL website.Once downloaded, you'll need to compile and install MySQL Proxy from source if you're using a tarball. Follow the instructions provided in the official documentation.2. Creating the Configuration FileMySQL Proxy uses a Lua script as its configuration file. This script defines the behavior of the proxy, including which servers it should route queries to, any query rewriting rules, and any other advanced functionality.A basic configuration file might look like this:lua-- Proxy definitionproxy.global_proxy_read_only = falseproxy.connect_backend_timeout = 4000proxy.lua_script = "proxy.lua"-- Backend serversproxy.servers = {{ address = "127.0.0.1", port = 3306 },{ address = "192.168.1.100", port = 3306 }}-- Default routing ruleproxy.default_query_rules = {{ rule = "proxy.tables.is_master()" }}In this example, the proxy is configured to connect to two backend MySQL servers. The proxy.default_query_rules section defines the default routing behavior, which in this case is to send all queries to the master server (assuming you have a Lua script named proxy.lua that defines the is_master function).3. Writing Lua ScriptsMySQL Proxy's flexibility comes from its ability to execute Lua scripts that can inspect and modify queries. You can write Lua scripts to implement complex routing logic, query rewriting, or even custom authentication mechanisms.The proxy.lua script in the example above would need to define the is_master function to determine which server is the master. This function would typically inspect the query or use some other logic to make the decision.4. Starting MySQL ProxyOnce you have your configuration file and any necessary Lua scripts in place, you can start MySQL Proxy by passing the configuration file as an argument:bashmysql-proxy --proxy-address=127.0.0.1:4040 --proxy-backend-addresses=127.0.0.1:3306 --proxy-lua-script=/path/to/your/proxy.luaIn this command, --proxy-address specifies the address and port that MySQL Proxy should listen on, and --proxy-backend-addresses lists the addresses of the backend MySQL servers. --proxy-lua-script points to your Lua script.5. Testing the ConfigurationAfter starting MySQL Proxy, you can test your configuration by connecting to it using a MySQL client and executing some queries. You should see the queries being routed to the appropriate backend server based on your Lua script and configuration file.6. Monitoring and TroubleshootingMySQL Proxy provides various logging and monitoring options to help you troubleshoot issues. You can configure MySQL Proxy to log queries, errors, and other events to a file or send them to a remote logging system.Additionally, you can use tools like mysql-proxy-admin to inspect the status of MySQL Proxy and its backends. This can be helpful for monitoring performance, identifying bottlenecks, and debugging problems.Remember to consult the official MySQL Proxy documentation for more detailed information on configuring and using MySQL Proxy, as well as examples of Lua scripts and advanced configuration options.
When it comes to Comcast residential internet service, one of the key decisions customers often face is whether to opt for a static IP address or a dynamic IP address. Both options have their own advantages and disadvantages, and the right choice depends on your specific needs and usage patterns. In this article, we'll explore the differences between static and dynamic IP addresses for Comcast residential customers and help you decide which one is right for you.Understanding Static IP AddressesA static IP address is a permanent, fixed IP address that is assigned to a device and remains unchanged. With a static IP address, your device will always have the same IP address, regardless of whether it's connected to the internet or not. This makes static IP addresses ideal for certain applications and services that require a consistent IP address.Advantages of Static IP Addresses:1.Consistency: A static IP address ensures that your device always has the same IP address, which can be useful for applications that require a consistent connection, such as remote access or VPNs.2.Ease of Access: With a static IP address, you can easily access your device from anywhere in the world using the same IP address. This makes it convenient for remote workers or individuals who need to access their home network remotely.3.Security: Static IP addresses can also be more secure, as they allow you to implement more robust security measures, such as firewall rules or access controls, that rely on specific IP addresses.Disadvantages of Static IP Addresses:1.Cost: Comcast typically charges an additional fee for static IP addresses, making them more expensive than dynamic IP addresses.2.Limited Availability: Static IP addresses are in limited supply, so they may not be available in all areas or for all customers.Understanding Dynamic IP AddressesA dynamic IP address is an IP address that is temporarily assigned to a device by a network's DHCP (Dynamic Host Configuration Protocol) server. With a dynamic IP address, your device will obtain an IP address from the DHCP server whenever it connects to the network, and this IP address may change over time.Advantages of Dynamic IP Addresses:1.Convenience: Dynamic IP addresses are automatically assigned by the DHCP server, eliminating the need for manual configuration. This makes them convenient for home networks with multiple devices.2.Cost: Dynamic IP addresses are typically free of charge, making them a more economical option for Comcast residential customers.3.Flexibility: Since dynamic IP addresses are assigned by the DHCP server, they can be easily reassigned if a device is removed from the network or if a new device is added.Disadvantages of Dynamic IP Addresses:1.Changing IP Addresses: The main disadvantage of dynamic IP addresses is that they can change over time. This can be problematic for applications or services that require a consistent IP address.2.Security Concerns: With changing IP addresses, it becomes more challenging to implement robust security measures that rely on specific IP addresses.Choosing Between Static and Dynamic IP AddressesThe right choice between a static and dynamic IP address depends on your specific needs and usage patterns. If you need a consistent IP address for remote access, VPNs, or other applications that require a fixed IP, then a static IP address may be the right choice for you. However, if you're looking for a convenient and economical option for your home network, then a dynamic IP address may be more suitable.Before making a decision, it's important to consider your budget, the availability of static IP addresses in your area, and your specific network requirements. You can also consult with Comcast's customer service team to get more information and advice on choosing the right IP address option for your needs.