Web scraping, also known as web harvesting or web data extraction, is the process of extracting data from websites. It allows you to gather information from the web for various purposes such as research, analysis, and content aggregation. In this article, we will explore how to use Python for web scraping and how you can get started with your own web scraping projects.Why Python for Web Scraping?Python is a popular programming language for web scraping due to its simplicity, readability, and a wide range of libraries and tools available for web scraping. Some of the key libraries for web scraping in Python include Beautiful Soup, Scrapy, and Requests. These libraries provide powerful features for parsing HTML, making HTTP requests, and extracting data from websites.Getting Started with Web Scraping in PythonBefore you start web scraping, it's important to understand the legal and ethical considerations associated with web scraping. Make sure to review the terms of use and the robots.txt file of the website you are scraping to ensure that you are not violating any rules or policies.Once you have a clear understanding of the legal aspects, you can start by installing the necessary libraries for web scraping. You can use pip, the package installer for Python, to install libraries such as Beautiful Soup and Requests. For example, you can install Beautiful Soup by running the following command in your terminal or command prompt:```pythonpip install beautifulsoup4```After installing the required libraries, you can start writing your web scraping code. Let's consider a simple example of scraping data from a website using Beautiful Soup. Suppose we want to extract the titles of articles from a news website. We can use Beautiful Soup to parse the HTML of the website and extract the relevant information.```pythonimport requestsfrom bs4 import BeautifulSoupurl = 'https://example.com/news'response = requests.get(url)soup = BeautifulSoup(response.text, 'html.parser')titles = soup.find_all('h2', class_='article-title')for title in titles:print(title.text)```In this example, we first make an HTTP request to the website using the Requests library. We then use Beautiful Soup to parse the HTML content of the website and extract the titles of articles by finding all elements with the specified class name.Challenges and Best PracticesWhile web scraping can be a powerful tool for gathering data, it also comes with its own set of challenges and best practices. Some of the common challenges include handling dynamic content, dealing with anti-scraping measures, and maintaining the reliability and performance of your scraping code.To overcome these challenges, it's important to follow best practices such as respecting the website's terms of use, using efficient scraping techniques, and handling errors gracefully. Additionally, you may need to use techniques such as browser automation or proxy rotation to bypass anti-scraping measures and access dynamic content.Python provides a powerful and versatile platform for web scraping, making it possible to extract data from websites for various applications. By leveraging libraries such as Beautiful Soup and Requests, you can easily parse HTML, make HTTP requests, and extract valuable information from websites. However, it's important to approach web scraping responsibly by respecting the legal and ethical considerations associated with it.In summary, web scraping with Python offers a wealth of opportunities for data gathering and analysis, but it's essential to use it in a responsible and ethical manner. Whether you're a beginner or an experienced developer, Python's rich ecosystem of web scraping tools can empower you to harness the power of web data for your projects.
In the digital world, servers play a crucial role in hosting websites, applications, and services. However, encountering a situation where your server has no IP address can be perplexing and disruptive. This article will explore the reasons why a server may not have an IP address, the implications of this issue, and the steps you can take to resolve it.Understanding IP AddressesAn IP (Internet Protocol) address is a unique identifier assigned to each device connected to a network. It serves two primary functions:1. Identification: It identifies the device on the network, allowing for communication between devices.2. Location Addressing: It provides information about the device's location within the network, enabling data routing.In essence, an IP address is essential for any server to communicate over the internet or a local network.Reasons Why a Server May Not Have an IP AddressThere are several reasons why a server might not have an assigned IP address:1. Network Configuration IssuesMisconfigurations in network settings can lead to the server not obtaining an IP address. This could involve incorrect settings in the server's operating system or issues with the network hardware.2. DHCP ProblemsMost servers obtain their IP addresses dynamically through a DHCP (Dynamic Host Configuration Protocol) server. If the DHCP server is down or misconfigured, the server may fail to receive an IP address.3. Network Interface Card (NIC) IssuesA malfunctioning or improperly configured Network Interface Card (NIC) can prevent a server from connecting to the network and obtaining an IP address.4. Firewall or Security SettingsOverly restrictive firewall or security settings may block the server from accessing the network, leading to an inability to obtain an IP address.5. Physical Connection ProblemsIssues with cables, switches, or routers can disrupt the connection between the server and the network, preventing the server from communicating and obtaining an IP address.6. Server Hardware FailuresHardware failures, such as a damaged NIC or motherboard, can also result in the server being unable to connect to the network.Implications of a Server Lacking an IP AddressWhen a server does not have an IP address, it cannot communicate with other devices on the network or access the internet. This can lead to several problems, including:- Inaccessibility: Users cannot access services hosted on the server, leading to downtime and potential loss of business.- Data Loss: If the server is part of a critical application, lack of access can result in data loss or corruption.- Operational Disruption: Other systems that rely on the server for data or services may also experience disruptions.Steps to Resolve the IssueIf you find yourself in a situation where your server has no IP address, follow these troubleshooting steps:Step 1: Check Physical Connections1. Inspect Cables: Ensure that all network cables are securely connected to both the server and the network switch or router.2. Test Network Ports: Try connecting the server to a different network port to rule out port issues.Step 2: Verify Network Configuration1. Access Network Settings: Log in to your server and access the network configuration settings.2. Check IP Settings: Ensure that the server is set to obtain an IP address automatically (DHCP) unless you are using a static IP configuration.3. Review Subnet Mask and Gateway: Verify that the subnet mask and default gateway are correctly configured.Step 3: Restart Network Services1. Restart DHCP Client: If your server uses DHCP, restart the DHCP client service. This can often resolve issues with obtaining an IP address.- On Windows, you can do this by opening Command Prompt and typing:```bashnet stop dhcpnet start dhcp```- On Linux, you can restart the networking service:```bashsudo systemctl restart networking```Step 4: Check DHCP Server1. Verify DHCP Server Status: Ensure that the DHCP server is operational and has available IP addresses to assign.2. Examine DHCP Logs: Check the logs on the DHCP server for any errors or indications that it is not functioning correctly.Step 5: Update Network Drivers1. Check for Driver Updates: Ensure that the network drivers on your server are up to date. Outdated drivers can cause connectivity issues.2. Reinstall Drivers: If necessary, uninstall and reinstall the network drivers to resolve any potential corruption.Step 6: Inspect Firewall Settings1. Review Firewall Rules: Ensure that the firewall settings are not blocking the server's network access.2. Temporarily Disable Firewall: As a troubleshooting step, temporarily disable the firewall to see if it resolves the IP address issue.Step 7: Check for Hardware Issues1. Test the NIC: If possible, test the Network Interface Card (NIC) in another server to determine if it is functioning properly.2. Inspect Server Hardware: Check for any signs of hardware failure, such as unusual noises or overheating components.Step 8: Assign a Static IP AddressIf DHCP is not functioning and you need immediate access, consider assigning a static IP address:1. Choose an Available IP Address: Select an IP address that is within the same subnet as your network but is not currently in use.2. Configure Static IP: Access the network settings on your server and manually enter the static IP address, subnet mask, and default gateway.Step 9: Reboot the ServerSometimes, a simple reboot can resolve network connectivity issues. Restart your server to see if it can obtain an IP address upon reboot.Preventing Future IssuesTo minimize the chances of encountering this issue in the future, consider the following best practices:1. Regularly Monitor Network Health: Use monitoring tools to keep an eye on your network's performance and health.2. Implement Redundancy: Consider setting up redundant DHCP servers to ensure that IP addresses can still be assigned if one server fails.3. Keep Software Updated: Regularly update your server's operating system and network drivers to ensure compatibility and stability.4. Conduct Regular Backups: Maintain regular backups of your server configurations and data to prevent loss during outages.ConclusionEncountering a situation where your server has no IP address can be frustrating, but with the right troubleshooting steps, you can resolve the issue effectively. By understanding the potential causes and implications, you can take proactive measures to ensure your server remains accessible and functional. Whether it's checking physical connections, verifying network configurations, or updating drivers, following these steps will help restore your server's connectivity and prevent future occurrences. With a stable IP address, your server can continue to serve its purpose, ensuring seamless communication and access for users.
In an increasingly digital world, online privacy and security have become paramount. One effective way to enhance your anonymity while browsing the internet is by using a SOCKS5 proxy server. This article will guide you through the process of developing a SOCKS5 proxy server using Java, providing you with a robust tool for secure web access.What is a SOCKS5 Proxy?SOCKS5 is a protocol that routes network packets between a client and a server through a proxy server. Unlike HTTP proxies, which only handle web traffic, SOCKS5 can manage any type of traffic, including email, file transfers, and peer-to-peer connections. This versatility makes SOCKS5 proxies popular among users who wish to maintain privacy and bypass geographical restrictions.Why Use Java for a SOCKS5 Proxy?Java is a versatile, platform-independent programming language that is widely used for network programming. Its built-in libraries and robust networking capabilities make it an excellent choice for developing a SOCKS5 proxy server. Additionally, Java's object-oriented nature allows for clean and maintainable code, which is essential for long-term projects.PrerequisitesBefore you begin, ensure that you have the following:1. Java Development Kit (JDK): Install the latest version of the JDK from the [official Oracle website].2. Integrated Development Environment (IDE): You can use any IDE such as IntelliJ IDEA, Eclipse, or NetBeans.3. Basic Knowledge of Java: Familiarity with Java syntax and concepts will be beneficial.Step 1: Setting Up Your Project1. Create a New Java Project: Open your IDE and create a new Java project. Name it something like `Socks5ProxyServer`.2. Create a Main Class: Create a new Java class named `Socks5ProxyServer`.Step 2: Writing the SOCKS5 Proxy Server CodeNow, let’s write the code for the SOCKS5 proxy server. Open the `Socks5ProxyServer.java` file and add the following code:```javaimport java.io.;import java.net.;public class Socks5ProxyServer {private static final int PORT = 1080; // Default SOCKS5 portpublic static void main(String[] args) {try (ServerSocket serverSocket = new ServerSocket(PORT)) {System.out.println("SOCKS5 Proxy Server running on port " + PORT + "...");while (true) {Socket clientSocket = serverSocket.accept();new Thread(new ProxyClientHandler(clientSocket)).start();}} catch (IOException e) {e.printStackTrace();}}}class ProxyClientHandler implements Runnable {private Socket clientSocket;public ProxyClientHandler(Socket socket) {this.clientSocket = socket;}@Overridepublic void run() {try (InputStream input = clientSocket.getInputStream();OutputStream output = clientSocket.getOutputStream()) {// SOCKS5 handshakebyte[] buffer = new byte[256];input.read(buffer);if (buffer[0] != 0x05) {return; // Not a SOCKS5 request}// No authentication requiredoutput.write(new byte[]{0x05, 0x00});// Read the SOCKS5 requestinput.read(buffer);int cmd = buffer[1];if (cmd == 0x01) { // CONNECT commandhandleConnect(buffer, input, output);} else {output.write(new byte[]{0x05, 0x07}); // Command not supported}} catch (IOException e) {e.printStackTrace();} finally {try {clientSocket.close();} catch (IOException e) {e.printStackTrace();}}}private void handleConnect(byte[] buffer, InputStream input, OutputStream output) throws IOException {// Extract the destination address and portint addressType = buffer[3];String destAddress;int destPort;if (addressType == 0x01) { // IPv4byte[] ip = new byte[4];input.read(ip);destAddress = InetAddress.getByAddress(ip).getHostAddress();destPort = ((buffer[8] & 0xFF) << 8) | (buffer[9] & 0xFF);} else if (addressType == 0x03) { // Domain nameint domainLength = buffer[4];byte[] domain = new byte[domainLength];input.read(domain);destAddress = new String(domain);destPort = ((buffer[5 + domainLength] & 0xFF) << 8) | (buffer[6 + domainLength] & 0xFF);} else {output.write(new byte[]{0x05, 0x08}); // Address type not supportedreturn;}// Connect to the destination servertry (Socket remoteSocket = new Socket(destAddress, destPort)) {// Connection successfuloutput.write(new byte[]{0x05, 0x00, 0x00, 0x01});output.write(InetAddress.getByName("127.0.0.1").getAddress()); // Bind to localhostoutput.write(new byte[]{0x00, 0x00}); // Port 0// Relay data between client and remote serverrelayData(input, output, remoteSocket);} catch (IOException e) {output.write(new byte[]{0x05, 0x01}); // General failure}}private void relayData(InputStream clientInput, OutputStream clientOutput, Socket remoteSocket) throws IOException {InputStream remoteInput = remoteSocket.getInputStream();OutputStream remoteOutput = remoteSocket.getOutputStream();Thread clientToRemote = new Thread(() -> {try {byte[] buffer = new byte[4096];int bytesRead;while ((bytesRead = clientInput.read(buffer)) != -1) {remoteOutput.write(buffer, 0, bytesRead);}} catch (IOException e) {e.printStackTrace();}});Thread remoteToClient = new Thread(() -> {try {byte[] buffer = new byte[4096];int bytesRead;while ((bytesRead = remoteInput.read(buffer)) != -1) {clientOutput.write(buffer, 0, bytesRead);}} catch (IOException e) {e.printStackTrace();}});clientToRemote.start();remoteToClient.start();try {clientToRemote.join();remoteToClient.join();} catch (InterruptedException e) {e.printStackTrace();}}}```Explanation of the Code1. Server Socket: The `Socks5ProxyServer` class creates a server socket that listens for incoming connections on the specified port (1080).2. Client Handler: Each incoming client connection is handled in a separate thread by the `ProxyClientHandler` class.3. SOCKS5 Handshake: The server performs the SOCKS5 handshake, responding to the client with the appropriate authentication method.4. CONNECT Command: If the command is `CONNECT`, the server extracts the destination address and port, establishes a connection to the remote server, and relays data between the client and the remote server.5. Data Relay: The `relayData` method manages the bi-directional data flow between the client and the destination server.Step 3: Running the SOCKS5 Proxy ServerTo run the SOCKS5 proxy server, follow these steps:1. Compile the Code: Open your terminal, navigate to your project directory, and compile the Java file:```bashjavac Socks5ProxyServer.java```2. Run the Server: Execute the compiled Java program:```bashjava Socks5ProxyServer```You should see a message indicating that the SOCKS5 proxy server is running.Step 4: Configuring Your ClientNow that your SOCKS5 proxy server is up and running, you can configure your applications to use it. Most web browsers and applications that support SOCKS5 proxies allow you to specify the proxy settings.Example Configuration in Firefox1. Open Firefox and go to Options.2. Scroll down to Network Settings and click on Settings.3. Select Manual proxy configuration.4. Enter `127.0.0.1` as the SOCKS Host and `1080` as the Port.5. Choose SOCKS v5 and click OK.Testing the ProxyTo test your SOCKS5 proxy, visit a website that displays your IP address, such as `whatismyip.com`. If everything is set up correctly, the IP address displayed should be that of the destination server you are connecting to through the proxy.Step 5: Security ConsiderationsWhile developing a SOCKS5 proxy server in Java can be an exciting project, it's essential to consider security implications:1. Access Control: Implement access controls to restrict who can use your proxy server. You can do this by checking the client's IP address and allowing only trusted addresses.2. Encryption: Consider adding layers of encryption (like using SSL/TLS) to secure the data transmitted through your proxy server.3. Monitoring: Regularly monitor logs to detect unauthorized access attempts or unusual activities.ConclusionDeveloping a SOCKS5 proxy server in Java is a rewarding project that enhances your understanding of networking and programming. The provided code offers a basic implementation that can be expanded with additional features such as user authentication, logging, and error handling.By mastering the creation of a SOCKS5 proxy server, you can take control of your online privacy and enjoy a more secure browsing experience. Whether for personal use or as part of a larger application, a SOCKS5 proxy server can be a valuable tool in today’s internet landscape.
Proxy servers play an important role in Internet use, especially for users who need to access content in a specific area. Building a Taiwan IP proxy server can help users bypass geographical restrictions, protect privacy, and increase access speed. This article will introduce in detail how to build a Taiwan IP proxy server, providing practical steps and tips.1. What is a proxy server?A proxy server is an intermediary server through which users access the Internet. When a user accesses a website through a proxy server, the target website can only see the IP address of the proxy server, but cannot obtain the user's real IP. This mechanism plays an important role in protecting user privacy, bypassing geographical restrictions, and increasing access speed.2. Why choose a Taiwan IP proxy server?There are several obvious benefits to choosing a Taiwan IP proxy server:- Access local content: Some websites or services are only available in specific regions, and using a Taiwan IP can help users access these contents.- Increase access speed: By choosing a proxy server closer to the target website, you can reduce latency and increase access speed.- Privacy protection: Hide the real IP address and protect personal privacy.3. Preparation for setting up a Taiwan IP proxy serverBefore setting up a Taiwan IP proxy server, you need to do some preparation:3.1 Choose a server providerChoosing a reliable server provider is the first step in setting up a proxy server. Here are some common cloud service providers that support servers in Taiwan:- Alibaba Cloud: Provides a variety of cloud servers and supports Taiwan.- Tencent Cloud: Has data centers in Taiwan and provides high-performance cloud services.- AWS: Amazon Cloud Services also has server options available in the Asia-Pacific region.3.2 Choose an operating systemWhen setting up a proxy server, it is also important to choose the right operating system. Common choices include:- Ubuntu: Open source and easy to use, suitable for beginners.- CentOS: High stability, suitable for enterprise-level applications.4. Steps to set up a Taiwan IP proxy server4.1 Create a cloud server instance1. Register an account: Register an account on the selected cloud service provider.2. Select server configuration: Select the appropriate server configuration according to your needs, including CPU, memory and storage space.3. Select region: Select Taiwan as the region of the server and ensure that you get a Taiwan IP address.4. Create instance: After completing the configuration, create a cloud server instance and record the IP address.4.2 Install proxy softwareInstalling proxy software on the server is a key step in setting up a proxy server. The following are commonly used proxy software:- Squid: A powerful proxy cache server that supports HTTP, HTTPS and FTP protocols.- Shadowsocks: A lightweight proxy tool suitable for users who need to bypass the firewall.4.2.1 Install Squid proxy serverTake Ubuntu as an example, the steps to install Squid are as follows:1. Update system:```bashsudo apt updatesudo apt upgrade```2. Install Squid:```bashsudo apt install squid```3. Configure Squid:Open the Squid configuration file:```bashsudo nano /etc/squid/squid.conf```Modify the following parameters:- http_port: Set the listening port (the default is 3128).- acl: Set the access control list to allow specific IPs to access the proxy.4. Restart Squid:```bashsudo systemctl restart squid```4.2.2 Install ShadowsocksIf you choose to use Shadowsocks, the installation steps are as follows:1. Install pip:```bashsudo apt install python3-pip```2. Install Shadowsocks:```bashpip3 install shadowsocks```3. Configure Shadowsocks:Create a configuration file `/etc/shadowsocks.json`, content example:```json{"server": "0.0.0.0","server_port": 8388,"password": "your_password","timeout": 300,"method": "aes-256-gcm"}```4. Start Shadowsocks:```bashssserver -c /etc/shadowsocks.json -d start```5. Test the proxy serverAfter the setup is complete, you need to test whether the proxy server is working properly:1. Configure the local browser: Set up the proxy in the browser and enter the IP address and port number of the Taiwan server.2. Visit the website: Try to visit a website that displays the IP address and check whether it is displayed as a Taiwan IP.6. Common problems and solutions6.1 Proxy cannot connectIf you cannot connect when using a proxy, it may be due to the following reasons:- Firewall settings: Make sure the server's firewall allows traffic on the proxy port.- Configuration error: Check the proxy server's configuration file to ensure that the settings are correct.6.2 Slow speedWhen using a proxy, if the speed is slow, you can try the following methods:- Optimize server configuration: Increase server bandwidth or choose a higher performance instance.- Change proxy software: Try different proxy software to find the most suitable solution.Building a Taiwan IP proxy server can help users access content in specific regions, protect privacy and increase access speed. With the detailed steps and practical tips provided in this article, you can easily build your own proxy server. If you encounter problems during the construction process, please refer to relevant materials or seek help. I hope this article can provide you with valuable information and help you successfully build a Taiwan IP proxy server.
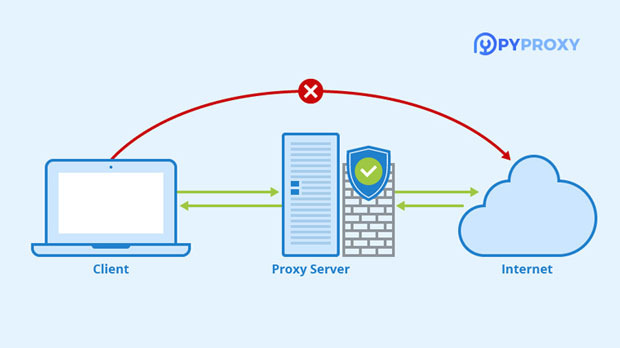
In the realm of networking, proxies play a pivotal role in addressing various challenges and enhancing the overall efficiency of network operations. Whether it's optimizing network performance, ensuring security, or enabling access to restricted content, proxies offer a versatile solution to a range of network issues. Let's delve into the ways in which proxies can effectively resolve common networking problems.1. Enhancing Security:Proxies act as intermediaries between users and the internet, effectively shielding the internal network from direct exposure to external threats. By routing all incoming and outgoing traffic through a proxy server, organizations can implement robust security measures such as firewalls, content filtering, and encryption. This significantly reduces the risk of cyber attacks, data breaches, and unauthorized access to sensitive information.2. Circumventing Restrictions:In many scenarios, users encounter restrictions when attempting to access certain websites or online services due to geographical limitations or organizational policies. Proxies offer a solution by allowing users to bypass these restrictions through techniques such as IP masking and geo-spoofing. This enables seamless access to region-locked content and facilitates unrestricted browsing, thereby overcoming accessibility barriers.3. Improving Performance:Network congestion and latency issues can hamper the speed and efficiency of data transfer. Proxies alleviate these concerns by caching frequently accessed web content, thus reducing the need for repeated requests to the original server. This not only accelerates data retrieval but also conserves bandwidth, leading to overall improvements in network performance and responsiveness.4. Monitoring and Filtering Traffic:Proxies enable granular control over network traffic by facilitating the monitoring and filtering of data packets. This capability empowers organizations to enforce usage policies, block malicious websites, and regulate the flow of information within the network. By inspecting and managing traffic at the proxy level, administrators can mitigate potential threats and maintain compliance with regulatory requirements.5. Anonymity and Privacy Protection:For individuals seeking anonymity and privacy while browsing the internet, proxies offer a means to conceal their IP addresses and online activities. By relaying requests through a proxy server, users can obscure their digital footprint and evade tracking mechanisms, thereby safeguarding their privacy and anonymity online.In conclusion, proxies serve as a versatile toolset for addressing an array of network challenges, ranging from security enhancements to performance optimizations and accessibility improvements. By leveraging the capabilities of proxies, organizations and individuals can effectively mitigate network issues and enhance their overall online experience. Understanding the diverse applications of proxies empowers stakeholders to make informed decisions regarding their network infrastructure and security strategies.
When it comes to choosing a SOCKS5 proxy, there are several factors to consider in order to ensure that you select the best option for your needs. SOCKS5 proxies are widely used for their ability to handle a variety of internet traffic, including web browsing, file sharing, and online gaming. Here are some key considerations to keep in mind when selecting a SOCKS5 proxy:1. Reliability and Speed:One of the most important factors to consider when choosing a SOCKS5 proxy is its reliability and speed. A reliable proxy should have minimal downtime and offer consistent performance. Additionally, it should provide fast connection speeds to ensure smooth and efficient internet browsing and data transfer.2. Location and Server Coverage:The geographical location of the proxy servers is another crucial consideration. Ideally, you should choose a SOCKS5 proxy provider that offers a wide range of server locations across different countries. This will allow you to access geo-restricted content and websites from around the world. Additionally, a diverse server coverage can help distribute the network load and improve overall performance.3. Security and Privacy:Security and privacy are paramount when using a SOCKS5 proxy. Look for a provider that offers strong encryption protocols and robust security features to protect your online activities and sensitive data. It's also important to ensure that the proxy provider has a clear privacy policy and does not log your internet usage or personal information.4. Compatibility and Ease of Use:Consider the compatibility of the SOCKS5 proxy with your devices and operating systems. A good proxy provider should offer support for a wide range of platforms, including Windows, macOS, Linux, iOS, and Android. Additionally, the setup process should be straightforward, and the provider should offer clear instructions for configuring the proxy on different devices.5. Customer Support and Reputation:Before choosing a SOCKS5 proxy provider, take the time to research their reputation and customer support quality. Look for reviews and testimonials from other users to gauge the provider's reliability and customer satisfaction. Additionally, ensure that the provider offers responsive customer support to address any technical issues or inquiries.6. Pricing and Plans:Finally, consider the pricing and subscription plans offered by different SOCKS5 proxy providers. Compare the features and pricing of various providers to find a balance between affordability and the features you require. Some providers offer flexible payment options, such as monthly or annual subscriptions, while others may offer free trials or money-back guarantees.In conclusion, selecting the right SOCKS5 proxy involves evaluating factors such as reliability, speed, server coverage, security, compatibility, customer support, and pricing. By carefully considering these aspects, you can choose a SOCKS5 proxy that meets your specific requirements and provides a secure and efficient internet browsing experience.
Configuring the IP address on a Windows computer is an essential task for connecting to a network. Whether you are setting up a home network or joining a corporate environment, understanding how to configure the IP address is crucial. In this guide, we will walk through the step-by-step process of configuring the IP address on a Windows computer.Step 1: Accessing Network SettingsTo configure the IP address on a Windows computer, start by accessing the Network Settings. This can be done by right-clicking on the network icon in the system tray and selecting "Open Network & Internet settings" or by navigating to the Control Panel and selecting "Network and Sharing Center."Step 2: Accessing Adapter SettingsOnce in the Network Settings, locate and click on "Change adapter options" or "Change adapter settings." This will display a list of network adapters installed on the computer.Step 3: Configuring IPv4 SettingsLocate the network adapter that you want to configure and right-click on it. Select "Properties" from the dropdown menu. In the Properties window, locate "Internet Protocol Version 4 (TCP/IPv4)" and select it. Click on the "Properties" button to access the IPv4 settings.Step 4: Manual IP Address ConfigurationIn the IPv4 Properties window, select the option to "Use the following IP address." Enter the desired IP address, subnet mask, and default gateway provided by your network administrator or ISP. You can also specify the preferred and alternate DNS server addresses if necessary. Click "OK" to save the changes.Step 5: Verifying ConfigurationAfter configuring the IP address, it is important to verify that the settings have been applied correctly. Open a command prompt and type "ipconfig /all" to view the network configuration details. Verify that the IP address, subnet mask, default gateway, and DNS server addresses match the values entered during configuration.Step 6: Testing ConnectivityOnce the IP address has been configured, test the connectivity by pinging other devices on the network or accessing websites on the internet. If the connectivity tests are successful, it indicates that the IP address has been configured correctly.Step 7: TroubleshootingIf there are any issues with connectivity after configuring the IP address, double-check the entered values for accuracy. Ensure that there are no conflicting IP addresses within the network and that the subnet mask and default gateway are configured correctly.Configuring the IP address on a Windows computer is a fundamental skill for anyone working with computer networks. By following these steps, you can successfully configure the IP address and connect to your desired network. Understanding how to configure network settings empowers users to troubleshoot connectivity issues and optimize their network experience.
In today's digital age, our smartphones have become an essential part of our daily lives. From browsing the internet to accessing various apps, our phones are constantly connected to the world wide web. One important piece of information that can be useful in certain situations is the IP address and port of your smartphone. In this article, we will discuss how to find your phone's IP address and port.What is an IP Address?An IP address, short for Internet Protocol address, is a unique numerical label assigned to each device connected to a computer network that uses the Internet Protocol for communication. In simpler terms, it is like a home address for your device on the internet. It allows other devices to identify and communicate with your device over the internet.Finding Your Phone's IP AddressThere are several methods to find your phone's IP address, depending on the operating system of your device.For Android Devices:1. Go to Settings.2. Tap on Wi-Fi.3. Select the network you are connected to.4. Your IP address will be displayed under the network's name.For iOS Devices:1. Go to Settings.2. Tap on Wi-Fi.3. Select the network you are connected to.4. Your IP address will be displayed next to "IP Address."For Windows Phone:1. Go to Settings.2. Tap on Wi-Fi.3. Select the network you are connected to.4. Your IP address will be displayed under "IP address."For other devices, you can refer to the specific instructions provided by the manufacturer.Finding Your Phone's PortThe port number is used to uniquely identify different applications or services running on a single device. To find your phone's port number, you can use various network scanning tools available on app stores for both Android and iOS devices.For Android Devices:1. Download a network scanning app from the Google Play Store.2. Open the app and allow necessary permissions.3. Scan the network to find your device's open ports.For iOS Devices:1. Download a network scanning app from the App Store.2. Open the app and allow necessary permissions.3. Scan the network to find your device's open ports.Understanding the Importance of IP Address and PortKnowing your phone's IP address and port can be useful in various scenarios. For example, if you are setting up a home security system that requires remote access to your phone's camera, you will need to know its IP address and port. Similarly, for gaming enthusiasts, knowing the port number can help in setting up multiplayer games or troubleshooting network connectivity issues.Security ConsiderationsWhile it is important to know your phone's IP address and port for certain applications, it is equally important to ensure that this information is kept secure. Avoid sharing this information with unknown or untrusted sources, as it can potentially be used for unauthorized access to your device or network.In conclusion, knowing how to find your phone's IP address and port can be beneficial in various situations, whether it's for setting up remote access or troubleshooting network issues. By following the simple steps outlined in this article, you can easily retrieve this information and use it responsibly for your specific needs.
In the digital age, having a public IP address is essential for various online activities, including hosting websites, gaming, and accessing remote servers. A public IP address allows your device to communicate over the internet and be accessible to others. This article will guide you through the process of obtaining your own public IP address, exploring the different types of IP addresses, and discussing the implications of having one.Understanding IP AddressesWhat is an IP Address?An IP (Internet Protocol) address is a unique numerical label assigned to each device connected to a computer network that uses the Internet Protocol for communication. It serves two main functions:1. Identification: It identifies the host or network interface.2. Location Addressing: It provides the location of the device within the network.Types of IP Addresses1. Public IP Address: This is the address assigned to your network by your Internet Service Provider (ISP) and is accessible from the internet. It allows other devices on the internet to find your network.2. Private IP Address: This is used within a local network and is not accessible from the internet. Devices within your home or office network use private IP addresses to communicate with each other.Dynamic vs. Static IP Addresses- Dynamic IP Address: Most ISPs assign dynamic IP addresses, which can change periodically. This means your public IP address may change whenever you restart your router or after a certain period.- Static IP Address: A static IP address does not change and is manually configured. This is often required for hosting servers or services that need a consistent address.Why You Might Need a Public IP AddressThere are several reasons why you might want a public IP address:1. Hosting a Website: If you want to host a website from your home or office, a public IP address is necessary for users to access it.2. Remote Access: You may want to access your home network or devices remotely, such as security cameras or a home server.3. Online Gaming: Some online games require a public IP address for hosting multiplayer sessions.4. Running Servers: If you plan to run a game server, FTP server, or any other type of server, a public IP address is essential.How to Obtain Your Own Public IP AddressStep 1: Check Your Current IP AddressBefore obtaining a public IP address, check if you already have one. You can do this by:1. Using Online Tools: Visit websites like `whatismyip.com` or `ipinfo.io`. These sites will display your current public IP address.2. Command Prompt: On Windows, open Command Prompt and type:```bashnslookup myip.opendns.com resolver1.opendns.com```On Linux or macOS, you can use:```bashdig +short myip.opendns.com @resolver1.opendns.com```Step 2: Contact Your Internet Service Provider (ISP)If you want a static public IP address, you will need to contact your ISP. Here’s how to approach this:1. Research ISPs: Not all ISPs offer static IP addresses. Research your ISP's policies regarding public IP addresses.2. Request a Static IP: Reach out to your ISP’s customer service and request a static IP address. Be prepared to provide information about your account.3. Inquire About Costs: Some ISPs charge an additional fee for a static IP address. Make sure to ask about any associated costs.Step 3: Configure Your RouterOnce you have obtained a public IP address, you may need to configure your router to use it effectively. Here’s how:1. Access Router Settings: Open a web browser and enter your router’s IP address (usually something like `192.168.1.1` or `192.168.0.1`). Log in with your credentials.2. Navigate to WAN Settings: Find the section labeled WAN, Internet, or similar.3. Set IP Address Type: If you have a static IP, select the option for static IP and enter the details provided by your ISP, including IP address, subnet mask, gateway, and DNS servers.4. Save Changes: After entering the information, save the changes and restart your router.Step 4: Test Your Public IP AddressAfter configuring your router, it’s essential to test your public IP address:1. Recheck Your IP: Use the same methods mentioned in Step 1 to verify that your public IP address is correctly configured.2. Port Forwarding: If you plan to host services (like a web server or game server), you may need to set up port forwarding on your router to direct traffic to the correct device on your network.Step 5: Secure Your NetworkHaving a public IP address exposes your network to the internet, so it’s crucial to secure it:1. Use a Firewall: Ensure that your router’s firewall is enabled to protect against unauthorized access.2. Change Default Credentials: Change the default username and password for your router to prevent unauthorized access.3. Regularly Update Firmware: Keep your router’s firmware updated to protect against vulnerabilities.4. Use Strong Passwords: For any services you host, use strong, unique passwords to prevent unauthorized access.Alternatives to Obtaining a Public IP AddressIf obtaining a public IP address directly from your ISP is not feasible, consider these alternatives:1. Dynamic DNS (DDNS)Dynamic DNS services allow you to map a domain name to your dynamic IP address. This way, even if your IP changes, you can still access your services using the domain name. Popular DDNS providers include:- No-IP- DynDNS- DuckDNS2. VPN ServicesUsing a Virtual Private Network (VPN) can provide you with a public IP address assigned by the VPN provider. This can be useful for accessing geo-restricted content or enhancing privacy.3. Cloud Hosting ServicesIf you need a public IP address for hosting, consider using cloud hosting services like Amazon Web Services (AWS), Google Cloud Platform (GCP), or DigitalOcean. These platforms provide public IP addresses for your virtual servers.ConclusionObtaining your own public IP address is a straightforward process that can enhance your online experience. Whether you need it for hosting a website, accessing devices remotely, or running servers, following the steps outlined in this article will help you secure a public IP address. Always remember to prioritize network security when exposing your devices to the internet. By doing so, you can enjoy the benefits of a public IP address while keeping your network safe and secure. With the right configuration and precautions, you can leverage your public IP address for various online activities and services.
In the realm of web development and network management, the ability to test a SOCKS5 proxy server is crucial for ensuring that it functions correctly and securely. One of the most effective tools for this purpose is cURL, a command-line tool that allows you to transfer data using various protocols, including HTTP, HTTPS, and SOCKS5. This article will guide you through the process of testing a SOCKS5 proxy server using cURL, covering installation, configuration, and practical examples.What is cURL?cURL (Client URL) is a command-line tool and library for transferring data with URLs. It supports numerous protocols, including HTTP, HTTPS, FTP, and more. cURL is widely used for testing and interacting with web services, making it an invaluable tool for developers and system administrators.What is a SOCKS5 Proxy?SOCKS5 is an internet protocol that routes network packets between a client and a server through a proxy server. Unlike HTTP proxies, which only handle web traffic, SOCKS5 can manage any type of traffic, including email, file transfers, and peer-to-peer connections. This versatility makes SOCKS5 proxies popular among users who wish to maintain privacy and bypass geographical restrictions.Why Test a SOCKS5 Proxy with cURL?Testing a SOCKS5 proxy server with cURL allows you to verify its functionality, check for connectivity issues, and assess the performance of the proxy. By using cURL, you can easily send requests through the proxy and observe the responses, ensuring that your proxy server is working as intended.PrerequisitesBefore you begin testing a SOCKS5 proxy server with cURL, ensure you have the following:1. cURL Installed: Most Linux distributions come with cURL pre-installed. You can check if cURL is installed by running `curl --version` in your terminal. If it’s not installed, you can install it using package managers like `apt` for Ubuntu or `brew` for macOS.For Ubuntu:```bashsudo apt updatesudo apt install curl```For macOS:```bashbrew install curl```2. Access to a SOCKS5 Proxy: You need the address and port of the SOCKS5 proxy server you want to test. This could be a proxy you set up yourself or a third-party service.Step 1: Basic cURL Command with SOCKS5 ProxyTo use cURL with a SOCKS5 proxy, you can use the `--socks5` option followed by the proxy's address. The basic syntax is as follows:```bashcurl --socks5 [proxy_address]:[port] [URL]```ExampleSuppose you have a SOCKS5 proxy server running at `127.0.0.1` on port `1080`, and you want to test it by accessing `http://example.com`. The command would be:```bashcurl --socks5 127.0.0.1:1080 http://example.com```If the proxy is functioning correctly, you should see the HTML content of the `example.com` homepage in your terminal.Step 2: Using SOCKS5 Proxy with AuthenticationIf your SOCKS5 proxy requires authentication, you can include your username and password in the command. The syntax for this is:```bashcurl --socks5-user [username]:[password] --socks5 [proxy_address]:[port] [URL]```ExampleFor a SOCKS5 proxy at `127.0.0.1:1080` that requires the username `user` and password `pass`, the command would be:```bashcurl --socks5-user user:pass --socks5 127.0.0.1:1080 http://example.com```Step 3: Testing HTTPS ConnectionsYou can also test secure HTTPS connections through a SOCKS5 proxy. The command remains the same; simply specify an HTTPS URL. For example:```bashcurl --socks5 127.0.0.1:1080 https://www.google.com```This command will route your request to Google through the SOCKS5 proxy, allowing you to verify that the proxy supports HTTPS connections.Step 4: Verbose Output for DebuggingWhen testing a SOCKS5 proxy, it can be helpful to see detailed output for debugging purposes. You can enable verbose mode by adding the `-v` option to your cURL command:```bashcurl -v --socks5 127.0.0.1:1080 http://example.com```This will provide you with detailed information about the connection process, including request and response headers, which can help diagnose any issues.Step 5: Using cURL with Proxy Environment VariablesIf you frequently use a SOCKS5 proxy, you can set environment variables to avoid specifying the proxy in every cURL command. You can set the `http_proxy` and `https_proxy` environment variables as follows:For Linux/MacOS```bashexport http_proxy=socks5://127.0.0.1:1080export https_proxy=socks5://127.0.0.1:1080```For WindowsIn the Command Prompt, you can set environment variables like this:```cmdset http_proxy=socks5://127.0.0.1:1080set https_proxy=socks5://127.0.0.1:1080```After setting these variables, you can simply use cURL without specifying the proxy each time:```bashcurl http://example.com```Step 6: Testing with Different ProtocolscURL supports various protocols, and you can test different types of requests through the SOCKS5 proxy. For example, you can use `-X` to specify the request method, such as `GET`, `POST`, `PUT`, or `DELETE`.Example: Testing a POST RequestTo test a POST request through the SOCKS5 proxy, use the following command:```bashcurl -X POST --socks5 127.0.0.1:1080 -d "param1=value1¶m2=value2" http://example.com/api```This command sends a POST request to `http://example.com/api` with the specified data.Step 7: Checking Proxy PerformanceTo evaluate the performance of your SOCKS5 proxy, you can use the `-w` option to display additional information after the transfer is complete. For example:```bashcurl -w "@curl-format.txt" --socks5 127.0.0.1:1080 -o /dev/null -s http://example.com```You can create a `curl-format.txt` file with the following content to display useful metrics:```time_namelookup: %{time_namelookup}\ntime_connect: %{time_connect}\ntime_appconnect: %{time_appconnect}\ntime_pretransfer: %{time_pretransfer}\ntime_redirect: %{time_redirect}\ntime_starttransfer: %{time_starttransfer}\n----------\ntime_total: %{time_total}\n```This will provide you with metrics on various stages of the request, helping you identify any bottlenecks.Step 8: Troubleshooting Common Issues1. Connection RefusedIf you receive a "Connection refused" error, ensure that the SOCKS5 proxy server is running and listening on the specified address and port. Double-check the proxy settings and ensure that the server is reachable.2. Authentication FailedIf you encounter an authentication error, verify that you are using the correct username and password. Ensure that the SOCKS5 proxy supports the authentication method you are using.3. Timeout ErrorsTimeout errors may indicate network issues or that the proxy server is overloaded. Try connecting to a different URL or check the server's load.4. Inconsistent ResultsIf you receive inconsistent results when testing, consider checking the proxy server's configuration. Ensure that it is correctly set up to handle the types of requests you are sending.ConclusionTesting a SOCKS5 proxy server with cURL is a straightforward process that can help you verify the functionality and performance of your proxy setup. By following the steps outlined in this article, you can effectively utilize cURL to interact with your SOCKS5 proxy, troubleshoot issues, and ensure a secure and reliable browsing experience.Whether you're a developer, system administrator, or just a privacy-conscious user, mastering the use of cURL with SOCKS5 proxies will enhance your ability to navigate the web securely and anonymously.