What determines the price difference between SOCKS5 proxies?
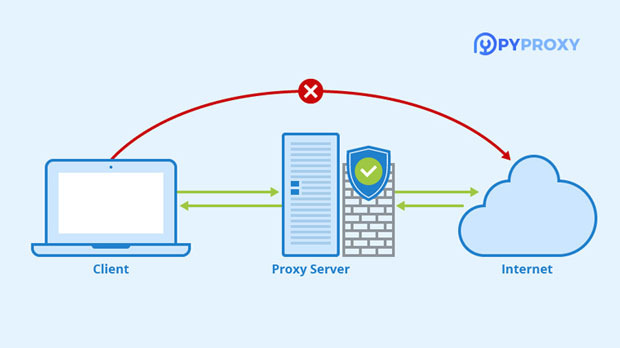
socks5 proxies have become an essential tool for internet users seeking privacy, security, and unrestricted access to content across the web. However, the price of these proxies can vary significantly depending on a range of factors. Understanding these elements is crucial for anyone looking to purchase SOCKS5 proxies, as it allows them to make informed decisions based on their needs and budget. This article delves into the key aspects that influence the pricing of SOCKS5 proxies, including performance, location, bandwidth, anonymity level, and provider reputation. Performance and ReliabilityOne of the primary factors that determine the price of a socks5 proxy is its performance. The speed, stability, and reliability of a proxy play a significant role in its cost. High-quality proxies are generally faster and more stable, ensuring that users experience minimal lag and downtime. These proxies are often hosted on high-performance servers with low latency, which directly influences their price.For example, proxies that provide excellent performance and low latency are typically more expensive than those with less reliable connections or slower speeds. Premium providers often invest in cutting-edge infrastructure and technology, which raises operational costs. As a result, these proxies come at a higher price to reflect the investment made in maintaining a high standard of service.Location of the Proxy ServerThe geographic location of the socks5 proxy server is another major factor in determining its price. Proxies located in high-demand areas, such as major cities in developed countries, tend to be more expensive. These locations offer better connectivity and faster speeds, which are highly sought after by users who need access to geo-restricted content or want to ensure reliable connections.On the other hand, proxies located in less popular or developing regions may be more affordable. However, these proxies may come with the trade-off of slower speeds, less reliable connections, or limited access to certain services. The availability of IP addresses and server resources in these regions also affects the pricing structure. Providers often charge more for proxies located in countries with high demand or where they have invested in premium infrastructure to ensure better performance.Bandwidth and Data UsageBandwidth refers to the amount of data that a proxy can handle over a specific period. Proxies with higher bandwidth allowances are generally more expensive because they are capable of supporting greater data transfers, making them ideal for users who need to handle large volumes of traffic, such as those involved in web scraping, streaming, or running bots.The more data a proxy can handle, the more it costs. This is especially true for SOCKS5 proxies used for high-demand activities, where the need for bandwidth is substantial. As providers offer more data throughput, they need to maintain larger and more powerful servers, leading to higher costs for customers. Therefore, users who require unlimited or high-volume bandwidth will typically face higher prices compared to those who only need minimal data transfer capabilities.Anonymity and Security LevelsSOCKS5 proxies are often used for their anonymity and security features. Some proxies offer high levels of anonymity, making it difficult for third parties to track users' online activities. These types of proxies usually employ advanced encryption protocols and additional privacy-enhancing features that contribute to their higher price.Proxies that offer higher levels of security, such as those that support secure socket layer (SSL) encryption or advanced authentication methods, tend to be more expensive than basic ones. These proxies not only protect users from hackers and malicious actors but also ensure that their identity remains concealed when accessing restricted or private content.In contrast, low-cost SOCKS5 proxies may offer basic security features but are less focused on providing robust anonymity. These proxies are typically adequate for less sensitive tasks, but they may not meet the privacy requirements of users who require strong protection against tracking or data theft.IP Pool Size and AvailabilityThe size and quality of the IP pool available with a SOCKS5 proxy are also key determinants of its price. A larger and more diverse pool of IP addresses often results in a higher price for the proxy service. This is because the availability of multiple IP addresses allows users to avoid IP bans or rate-limiting, which is crucial for activities like web scraping, social media automation, or accessing geo-restricted content.Proxies with a large pool of residential IP addresses are typically more expensive than those with a smaller pool of data center IPs. Residential IPs are less likely to be detected and blocked, which is why they come at a premium price. On the other hand, data center proxies, while cheaper, are more easily identifiable and can be blocked by websites, making them less desirable for certain use cases.Provider Reputation and SupportThe reputation and customer support offered by the provider also influence the price of SOCKS5 proxies. Established providers with a track record of reliability and customer satisfaction can command higher prices for their services. These providers invest in maintaining a high level of customer support, offering 24/7 assistance, troubleshooting, and proactive monitoring to ensure the proxies continue to function optimally.Providers with strong reputations for uptime, speed, and security are more likely to charge premium rates for their proxies. They also tend to offer value-added services, such as enhanced security features or custom configurations, which further increase the overall cost. Conversely, less well-known providers may offer cheaper proxies but may not provide the same level of service, reliability, or security.Subscription Length and Bulk PurchasesThe pricing structure for SOCKS5 proxies can also vary depending on the subscription length or the number of proxies purchased. Short-term subscriptions or single proxy purchases often come at a higher per-unit cost compared to long-term plans or bulk purchases. Providers offer discounts or reduced rates for customers who commit to longer periods or buy in larger quantities.For businesses or users with extensive proxy needs, bulk purchases are often the most cost-effective option. However, these customers may need to balance the price with the quality of service they require. The trade-off between cost and performance is something that should be carefully considered when buying in bulk.ConclusionThe price differences in SOCKS5 proxies are influenced by a variety of factors, including performance, location, bandwidth, anonymity, security, IP pool size, provider reputation, and subscription options. Users must assess their specific needs and requirements before selecting a proxy service. While high-quality proxies come at a premium, they offer better performance, security, and anonymity, which may be worth the investment for users with demanding tasks or privacy concerns.Understanding these pricing factors helps users make more informed decisions and choose the right SOCKS5 proxy for their particular use case, whether for personal privacy, business operations, or other online activities. Ultimately, the value derived from a SOCKS5 proxy should align with the user's specific needs, ensuring both cost-effectiveness and functionality.
2025-01-09