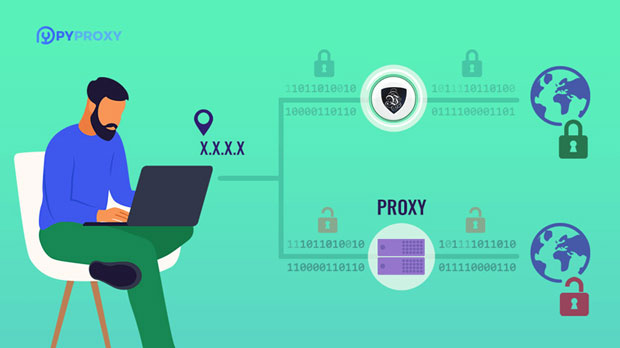
Installing a proxy on your device can be a valuable tool for enhancing online privacy, bypassing geo-restrictions, or accessing blocked content. However, it's essential to understand the different types of proxies and how to install them correctly to ensure optimal performance and security. Here's a step-by-step guide on how to install a proxy on your device.1. Understand Proxy TypesBefore you begin, it's important to understand the different types of proxies available. The most common types are:HTTP Proxies: These proxies forward HTTP requests, making them ideal for web browsing.HTTPS Proxies: Similar to HTTP proxies, but they provide an encrypted connection for more secure browsing.SOCKS Proxies: SOCKS proxies can handle a wider range of protocols and are often used for applications beyond web browsing.2. Choose a Proxy ProviderNext, you need to choose a reliable proxy provider. Look for providers that offer high-speed connections, good uptime, and secure encryption. Paid proxies are often more reliable than free options.3. Gather Proxy InformationOnce you've chosen a proxy provider, you'll need to gather the necessary information to configure your proxy. This typically includes the proxy server's IP address, port number, username (if required), and password (if required).4. Configure Your DeviceThe exact steps to configure your proxy will depend on the type of device you're using. Here are the general steps for some common devices:For Windows:Open "Settings" and navigate to "Network & Internet."Click on "Proxy" in the left pane.Enable the "Use a proxy server" option.Enter the proxy server's IP address and port number.If required, enter the username and password.Click "Save" to apply the changes.For macOS:Open "System Preferences" and click on "Network."Select the network connection you want to configure (e.g., Wi-Fi or Ethernet).Click on "Advanced" in the lower right corner.Go to the "Proxies" tab.Select the protocols you want to configure (e.g., HTTP or HTTPS).Enter the proxy server's IP address and port number.If required, enter the username and password.Click "OK" and then "Apply" to save the changes.For Mobile Devices (Android/iOS):Open the "Settings" app.Navigate to the "Wi-Fi" or "Network" section.Select the Wi-Fi network you're connected to.Scroll down and look for the "Proxy" section.Select "Manual" and enter the proxy server's IP address and port number.If required, enter the username and password.Save the changes.5. Test Your ProxyAfter configuring your proxy, it's important to test it to ensure it's working correctly. You can use online tools or services to check your IP address and location to verify that you're connected through the proxy.6. Maintain Your ProxyRemember to keep your proxy updated and secure. Regularly check for updates from your proxy provider and ensure your username and password are secure. If you encounter any issues with your proxy, contact your provider for assistance.Installing a proxy on your device can provide numerous benefits, but it's crucial to choose a reliable provider and configure your proxy correctly. By following the steps outlined in this article, you can easily install a proxy on your device and enjoy a more secure and private online experience.
In today's interconnected world, having a static IP address can be extremely beneficial for a variety of reasons, including improved security, easier remote access, and hosting services. However, obtaining a static IP address is not as straightforward as it might seem. Here's a step-by-step guide on how to acquire a static IP address for your network.Step 1: Understanding Static IP AddressesBefore we delve into the process, let's first understand what a static IP address is. A static IP address is an IP address that is permanently assigned to a device or network interface. Unlike dynamic IP addresses, which are assigned temporarily by a DHCP (Dynamic Host Configuration Protocol) server, static IP addresses remain the same regardless of the device's network connection status.Step 2: Determine Your Need for a Static IPBefore you proceed, it's crucial to assess whether you truly need a static IP address. Static IP addresses are often used for servers, network equipment, and devices that require a consistent IP address for remote access or hosting services. If you're simply using a home network or a small business network with no specific requirements for a static IP, you might be able to get by with a dynamic IP address.Step 3: Check with Your ISPMost often, your Internet Service Provider (ISP) will assign you a dynamic IP address by default. If you require a static IP address, you'll need to contact your ISP and request it. Keep in mind that some ISPs may charge a monthly fee for providing a static IP address.Step 4: Configure Your Router or ModemOnce you've obtained a static IP address from your ISP, you'll need to configure your router or modem to use it. The process varies depending on the make and model of your device, but typically, you'll need to access the device's settings or control panel and navigate to the network or IP settings section. Here, you'll find options to assign a static IP address to your network interface.Step 5: Configure Your DeviceIf you're assigning a static IP address directly to a device rather than a router or modem, you'll need to access the device's network settings. Depending on the device, this may involve navigating to the network or network interface settings. Once there, you'll need to manually enter the static IP address provided by your ISP along with any other relevant network information, such as the subnet mask, gateway, and DNS servers.Step 6: Test and VerifyAfter configuring your router, modem, or device with a static IP address, it's essential to test and verify that it's working correctly. You can do this by checking your device's IP address settings to ensure that the static IP address has been successfully applied. Additionally, you can use tools like ping or traceroute to test connectivity and ensure that your device is accessible using the new static IP address.Obtaining a static IP address can be a valuable asset for your network, providing improved security, easier remote access, and the ability to host services. However, it's important to understand your needs and ensure that you have the necessary permissions and information from your ISP before proceeding. By following the steps outlined in this article, you can successfully configure a static IP address for your router, modem, or device.
In today's digital world, data centers play a pivotal role in storing, processing, and distributing vast amounts of information. One crucial aspect of setting up and managing a data center is acquiring a suitable IP address. This article will guide you through the process of obtaining an IP address for your data center.Step 1: Understanding IP AddressesBefore we dive into the acquisition process, let's briefly review what an IP address is. An IP address (Internet Protocol address) is a unique numerical identifier assigned to every device connected to the internet. It allows devices to communicate with each other over the internet. In the context of data centers, IP addresses are used to identify and access servers, routers, firewalls, and other networking equipment.Step 2: Determining Your IP Address NeedsBefore obtaining an IP address, you need to determine your specific needs. Consider the number of devices you plan to connect to the internet in your data center, as well as any specific requirements or restrictions you may have. For instance, if you're setting up a high-availability environment, you may need multiple IP addresses for load balancing or failover purposes.Step 3: Choosing an IP Address Allocation MethodThere are two primary methods of obtaining IP addresses: static and dynamic allocation. Static allocation involves manually assigning a fixed IP address to each device in your data center. This method is suitable for environments where IP addresses don't change frequently. Dynamic allocation, on the other hand, allows devices to automatically obtain an IP address from a pool of available addresses when they connect to the network. This method is more flexible and scalable, but it requires additional networking infrastructure such as DHCP (Dynamic Host Configuration Protocol) servers.Step 4: Contacting an Internet Service Provider (ISP)If you don't already have a dedicated internet connection for your data center, you'll need to contact an ISP to establish one. When selecting an ISP, consider factors such as bandwidth, latency, reliability, and cost. Once you've chosen an ISP, you can discuss your IP address needs with them and determine the best allocation method based on your requirements.Step 5: Configuring Your Network EquipmentOnce you've obtained your IP addresses from the ISP, you'll need to configure your network equipment to use them. This includes setting up routers, switches, firewalls, and other networking devices to route and secure traffic to and from your data center. Depending on your chosen allocation method, you may need to manually configure static IP addresses on each device or set up DHCP servers to automatically assign IP addresses.Step 6: Testing and VerifyingAfter configuring your network equipment, it's crucial to test and verify that your IP addresses are working correctly. Perform connectivity tests between devices in your data center and external networks to ensure that traffic is flowing as expected. Use tools like ping, traceroute, and network monitoring software to identify any issues or bottlenecks in your network.Obtaining IP addresses for your data center is an essential step in establishing a reliable and secure internet connection. By understanding your specific needs, choosing an appropriate allocation method, and working with a reputable ISP, you can ensure that your data center has the necessary IP addresses to support its operations. Don't forget to test and verify your configuration to ensure that everything is working as expected.
In today's digital landscape, domain names have become the primary way for users to identify and access websites. While IP addresses serve as the technical identifier for every device connected to the internet, domain names provide a more user-friendly and memorable alternative. Converting an IP address to a domain name, therefore, is an essential step in establishing a website's online presence. Here's a step-by-step guide on how to accomplish this process.Step 1: Understanding IP Addresses and Domain NamesBefore delving into the conversion process, it's crucial to understand the fundamental difference between IP addresses and domain names. An IP address is a unique numerical identifier assigned to each device connected to the internet. It consists of four sets of numbers, separated by dots, such as 192.168.1.1. Domain names, on the other hand, are human-readable labels that represent IP addresses. For example, "example.com" is a domain name that represents an IP address.Step 2: Choosing a Domain NameThe first step in converting an IP address to a domain name is to select a suitable domain name. Your domain name should be easy to remember, relevant to your business or website's purpose, and free from any legal issues. You can use domain name generators or consult with branding experts to help you brainstorm unique and catchy domain names.Step 3: Registering the Domain NameOnce you've chosen a domain name, you'll need to register it with a domain name registrar. These companies provide a platform for purchasing and managing domain names. During the registration process, you'll be asked to provide personal information, select a domain extension (such as ".com", ".net", or ".org"), and choose a payment plan. Make sure to choose a reputable registrar that offers secure and reliable services.Step 4: Configuring DNS SettingsAfter registering your domain name, you'll need to configure its DNS (Domain Name System) settings. DNS is a global network of servers that translates domain names into IP addresses. Your registrar will provide you with a control panel where you can manage your DNS settings. Here, you'll need to create an "A" record that points your domain name to the IP address of your website's server. This process is known as "pointing" or "delegating" your domain.Step 5: Waiting for DNS PropagationOnce you've configured your DNS settings, it can take some time for the changes to propagate across the internet. DNS propagation is the process of updating DNS records across the global network of servers. The length of this process can vary, but it typically takes anywhere from a few minutes to a few hours. During this time, some users may still be able to access your website using the old IP address or may encounter temporary errors.Step 6: Testing and VerifyingAfter DNS propagation has completed, you should test your new domain name to ensure it's working properly. Try accessing your website using the domain name instead of the IP address. If everything is configured correctly, you should be able to view your website as expected. Additionally, you can use tools like "ping" or "nslookup" to verify that your domain name is resolving to the correct IP address.Converting an IP address to a domain name is a crucial step in establishing a website's online presence. By choosing a suitable domain name, registering it with a reputable registrar, and configuring DNS settings correctly, you can ensure that users can easily find and access your website. Remember to test and verify your new domain name to ensure it's working properly and resolving to the correct IP address.
In today's digital era, hiding your IP address can be a valuable tool for protecting your privacy and security online. An IP address is a unique identifier that reveals your device's location on the internet, making it vulnerable to potential threats and intrusions. However, there are several ways you can conceal your IP address and enhance your online anonymity. Here's a guide on how to hide your IP address.1. Use a Virtual Private Network (VPN)A VPN is one of the most effective ways to hide your IP address. It encrypts your internet connection and routes your traffic through a remote server, making your actual IP address invisible to others. By connecting to a VPN server, your traffic appears to originate from that server's IP address, not your own. Choose a reputable VPN provider with a strong encryption protocol and a large server network to ensure maximum privacy and anonymity.2. Utilize a Proxy ServerA proxy server is another method to hide your IP address. It acts as an intermediary between your device and the internet, forwarding your requests and receiving responses on your behalf. When you connect to a proxy server, your requests are sent through the proxy's IP address, concealing your actual IP. However, it's worth noting that proxies may not offer the same level of security and encryption as a VPN.3. Use the Tor NetworkThe Tor (The Onion Router) network is a free and open-source software that enables anonymous communication. It routes your internet traffic through a series of volunteer-operated servers, encrypting your data multiple times along the way. This process makes it difficult for anyone to trace your traffic back to your original IP address. Tor is often used by activists, journalists, and other individuals who require a high level of anonymity.4. Connect to a Public Wi-Fi NetworkConnecting to a public Wi-Fi network can also help hide your IP address, though it's not the most secure option. Public Wi-Fi networks typically assign a shared IP address to all connected devices, making it difficult to identify specific users. However, it's essential to be cautious when using public Wi-Fi, as these networks are often unsecured and vulnerable to hackers. Use a VPN or proxy server for added security.5. Employ a Web-based Proxy ServiceWeb-based proxy services allow you to access websites through their servers, concealing your IP address. These services are often free and easy to use, but they may not provide the same level of security and encryption as a VPN or Tor. Additionally, some web-based proxies may log your browsing activity or inject advertisements into the pages you visit.It's important to note that hiding your IP address doesn't guarantee complete anonymity online. However, it can significantly increase your privacy and security by making it more difficult for others to track your online activities and identify your device. Remember to choose a reputable service provider, stay vigilant when using public Wi-Fi, and consider employing multiple methods to enhance your online anonymity.
In the realm of networking and telecommunications, IP addresses play a crucial role. They serve as unique identifiers for devices connected to the internet, enabling them to communicate with each other. Understanding the basic characteristics of IP addresses is essential for anyone interested in networking or the internet's inner workings. Here, we explore some of the key features of IP addresses.1. UniquenessOne of the most fundamental characteristics of IP addresses is their uniqueness. Each IP address is distinct and cannot be duplicated. This ensures that data packets are delivered to the correct destination, as each device on the internet has a unique IP address. The uniqueness of IP addresses also helps prevent conflicts and ensures smooth communication on the internet.2. Hierarchical StructureIP addresses have a hierarchical structure that allows for efficient routing and organization. This structure is based on the IP address's subnet mask, which divides the address into network and host portions. The network portion identifies the network segment, while the host portion identifies a specific device on that network. This hierarchical structure enables routers and other network devices to efficiently determine the best path for data packets to travel.3. Static and Dynamic AllocationIP addresses can be allocated statically or dynamically. Static IP addresses are permanently assigned to a device and do not change, even if the device is powered off or disconnected from the network. Dynamic IP addresses, on the other hand, are assigned temporarily by a DHCP (Dynamic Host Configuration Protocol) server and can change over time. Static IP addresses are typically used for servers and other devices that require a consistent IP address, while dynamic IP addresses are common for end-user devices like computers and smartphones.4. IPv4 and IPv6There are two main versions of IP addresses: IPv4 and IPv6. IPv4 is the older version, using 32-bit addresses that can represent approximately 4 billion unique addresses. However, due to the rapid growth of the internet and the exhaustion of IPv4 addresses, IPv6 was developed. IPv6 uses 128-bit addresses, providing a virtually unlimited number of unique IP addresses. IPv6 also introduces new features and improvements compared to IPv4, such as improved security and better support for mobile devices.5. Public and Private AddressesIP addresses can be classified as public or private. Public IP addresses are assigned by internet service providers (ISPs) and are routable on the global internet. They are used by servers and other devices that need to be accessible from anywhere on the internet. Private IP addresses, on the other hand, are used within private networks, such as home or corporate networks. They are not routable on the global internet and are only visible within the local network. Private IP addresses help conserve public IP address space and improve network security.In conclusion, IP addresses are the fundamental building blocks of the internet. Their uniqueness, hierarchical structure, static and dynamic allocation, IPv4 and IPv6 versions, and public and private classification enable devices to communicate efficiently and securely on the global network. Understanding these basic characteristics of IP addresses is crucial for anyone interested in networking or the internet's operation.
In today's digital world, having a dedicated IP address can be crucial for businesses and individuals who require a unique and static IP for various reasons. Dedicated IP addresses provide increased stability, security, and often improved performance compared to shared IP addresses. Here's a guide on how to purchase a dedicated IP address.1. Determine Your NeedsBefore purchasing a dedicated IP address, it's essential to understand why you need one. Some common reasons for getting a dedicated IP include hosting websites, setting up a VPN server, running certain types of software that require a static IP, or avoiding IP-based restrictions.2. Research IP ProvidersThere are various providers that offer dedicated IP addresses, including internet service providers (ISPs), web hosting companies, and cloud service providers. Start by researching these providers and comparing their services, prices, and reliability.3. Consider Your BudgetDedicated IP addresses can vary in price depending on the provider and the type of IP you need (IPv4 or IPv6). Set a budget and determine how much you're willing to spend on a dedicated IP. Keep in mind that some providers may offer discounts or bundles with other services.4. Contact the ProviderOnce you've identified a potential provider, contact them to inquire about purchasing a dedicated IP. Provide them with your requirements, such as the IP type, location, and any additional services you may need.5. Choose the Right IP TypeIP addresses can be divided into two types: IPv4 and IPv6. IPv4 is the older version and is more widely used, while IPv6 is the newer version that provides a virtually unlimited number of addresses. Consider which IP type best suits your needs. IPv4 addresses may be more expensive due to their scarcity.6. Discuss Pricing and Payment OptionsProviders will typically have different pricing options for dedicated IP addresses. Discuss the pricing with the provider and choose a payment option that suits you. Keep in mind that some providers may require upfront payment or recurring fees.7. Complete the PurchaseOnce you've agreed on the terms and pricing, complete the purchase process. This may involve filling out forms, providing payment information, and signing a service agreement.8. Configure Your Dedicated IPAfter purchasing your dedicated IP, you'll need to configure it on your device or server. The configuration process will vary depending on your network setup and the provider's instructions. Follow the provider's guidelines carefully to ensure your dedicated IP is set up correctly.9. Test and VerifyOnce your dedicated IP is configured, test it to ensure it's working correctly. You can use various tools and websites to check your IP address and verify that it's the one you purchased.10. Maintain and UpdateRemember to keep your dedicated IP address updated and secure. Regularly check for any changes or issues with your IP and take necessary actions to address them.In conclusion, purchasing a dedicated IP address can be a valuable asset for businesses and individuals who require a unique and static IP. By following the steps outlined in this guide, you can successfully purchase and configure a dedicated IP address that meets your needs.
Changing your IP address can be necessary for various reasons, such as bypassing geolocation restrictions, improving network security, or troubleshooting network issues. However, it's essential to note that IP addresses are assigned by your internet service provider (ISP) or network administrator, and changing them can have implications depending on your network setup. Here's a guide on how to change your IP address, considering different scenarios.1. Restarting Your Router or ModemThe simplest way to change your IP address, especially if you're on a home network, is to restart your router or modem. This will cause your ISP to assign a new IP address to your device when it reconnects to the internet.Turn off your router or modem.Wait for a few minutes, usually around 30 seconds to 1 minute.Turn your router or modem back on and wait for it to fully connect to the internet.2. Using a VPN (Virtual Private Network)If you're looking to change your IP address for privacy or to access content in a different region, using a VPN is a popular option. A VPN encrypts your internet connection and routes it through a server in another location, giving you a different IP address.Choose a reputable VPN service provider and sign up for an account.Download and install the VPN software on your device.Connect to a VPN server in the desired location.Your IP address will now appear as if it's coming from the VPN server's location.3. Requesting a Static IP Address from Your ISPIf you need a permanent, static IP address for your home or business network, you can request one from your ISP. A static IP address doesn't change, unlike a dynamic IP address that can change over time.Contact your ISP and inquire about static IP address options.Provide the necessary information, such as your account details and the reason for needing a static IP.Your ISP will assign a static IP address to your network and provide you with the necessary configuration details.4. Using a Proxy ServerA proxy server acts as an intermediary between your device and the internet, allowing you to access websites and services through a different IP address. Proxies are often used for anonymity or to bypass geolocation restrictions.Find a proxy server that meets your needs, such as a free or paid proxy service.Configure your device's network settings to use the proxy server.Your IP address will now appear as if it's coming from the proxy server's location.5. Changing Your IP Address on a Mobile DeviceIf you're using a mobile device and want to change your IP address, you can try connecting to a different Wi-Fi network or using a mobile data connection.Connect to a different Wi-Fi network that uses a different IP address range.Alternatively, turn off Wi-Fi and use your mobile data connection.6. Considerations and WarningsChanging your IP address can have implications for network security and access. Make sure you understand the risks and consequences before making any changes.If you're using a VPN or proxy server, choose a reputable service provider to ensure your privacy and security.Changing your IP address may not always work for bypassing geolocation restrictions, as some services use other methods to determine your location.If you're changing your IP address for network troubleshooting, make sure you understand the network setup and configurations to avoid causing further issues.In conclusion, changing your IP address can be achieved through various methods, depending on your needs and network setup. Whether you're using a VPN, proxy server, or simply restarting your router, it's essential to understand the implications and risks before making any changes.
In today's interconnected world, routers play a crucial role in connecting our devices to the internet. As a network hub, routers have their own unique IP addresses, which allow us to access their settings and configurations. If you need to access your router's settings for troubleshooting, customization, or any other reason, knowing how to check your router's IP address is essential. Here's a step-by-step guide on how to do it.1. Understanding Router IP AddressesA router's IP address is a unique identifier that allows devices on a network to communicate with it. It is typically a private IP address, meaning it is not publicly routable on the internet. Most home routers use the 192.168.x.x or 10.x.x.x IP address ranges.2. Finding Your Router's IP Address on WindowsOn Windows, you can use the Command Prompt to find your router's IP address. Here's how:Open the Command Prompt by searching for "cmd" in the Start Menu or pressing Win + R and typing "cmd."Type the command "ipconfig" and press Enter.Scroll through the output to find the "Default Gateway" line. This is your router's IP address.3. Finding Your Router's IP Address on macOSOn macOS, you can use the Network Utility tool to find your router's IP address. Here's how:Open the Applications folder and navigate to Utilities > Network Utility.Click on the "Traceroute" tab.Type a known internet address, such as "http://www.google.com," into the "Domain" field and click on "Trace."In the resulting traceroute output, look for the first IP address that is not a public internet address. This is your router's IP address.4. Finding Your Router's IP Address on LinuxOn Linux, you can use the terminal to find your router's IP address. Here's how:Open a terminal window.Type the command "ip route" or "route -n" and press Enter.Look for the line that starts with "default via" or "0.0.0.0." The IP address next to it is your router's IP address.5. Using Router LabelsIf you're having difficulty finding your router's IP address using the methods above, you can also check the label on the router itself. Many routers have a sticker or label with information like the model number, serial number, and the default IP address.6. Accessing Your Router's SettingsOnce you have your router's IP address, you can access its settings by opening a web browser and typing the IP address into the address bar. You will then be prompted to log in with the router's username and password, which are typically provided in the router's documentation or on the label.7. Additional TipsIf you forget your router's username or password, you may need to reset the router to its factory settings. Be sure to check your router's documentation for specific instructions on how to do this.If your router is not connecting to the internet or other devices, checking its IP address and settings can help troubleshoot the issue.Keep in mind that some routers may have multiple IP addresses, depending on their configuration and the number of networks they're connected to. Always make sure you're accessing the correct IP address for the settings you want to change.In conclusion, knowing how to check your router's IP address is a valuable skill that can help you troubleshoot network issues, customize router settings, and access advanced features. Whether you're using Windows, macOS, or Linux, there are several methods you can use to find your router's IP address quickly and easily.
In today's interconnected world, the Internet Protocol (IP) address is a fundamental identifier for any device communicating over the internet. While static IP addresses remain fixed, dynamic IP addresses change periodically, usually when a device reconnects to the network. In some cases, it may be desirable to have an IP address change automatically, such as for privacy reasons or to obtain a new address from the network's DHCP server. Here's a guide on how to set up automatic IP address changes for various devices and operating systems.1. Understanding DHCPDynamic Host Configuration Protocol (DHCP) is a network protocol that enables a server to automatically assign IP addresses to devices on a network. Most home and office networks use DHCP to manage IP addresses, making it easy for devices to connect and obtain the necessary network settings.2. Setting Up Automatic IP Address Changes on WindowsOn Windows, the default setting is to obtain an IP address automatically from a DHCP server. However, if your device is using a static IP address, you can change it to dynamic by following these steps:Open the Control Panel and navigate to Network and Internet > Network and Sharing Center.Click on "Change adapter settings" on the left side.Right-click on your network connection (e.g., Ethernet or Wi-Fi) and select "Properties."Scroll down and select "Internet Protocol Version 4 (TCP/IPv4)" and click on "Properties."Ensure that the "Obtain an IP address automatically" option is selected.Click on "OK" to save the changes.3. Setting Up Automatic IP Address Changes on macOSOn macOS, you can also configure your network settings to obtain an IP address automatically:Open System Preferences and click on "Network."Select your network connection (e.g., Wi-Fi or Ethernet) from the left side.Click on "Advanced" and then on the "TCP/IP" tab.Ensure that the "Configure IPv4" setting is set to "Using DHCP."Click on "OK" and then "Apply" to save the changes.4. Setting Up Automatic IP Address Changes on LinuxLinux distributions offer various methods to configure network settings, but most desktop environments have a graphical user interface for managing network connections. Here's a general approach:Open your network settings or network manager.Find your network connection and edit its settings.Under the IPv4 settings, select the "Automatic (DHCP)" method.Apply the changes and restart your network connection or your device.5. Additional ConsiderationsRouter Configuration: If your router is configured to assign static IP addresses to specific devices, you may need to change the router's settings to allow DHCP to assign addresses dynamically.DHCP Server: Ensure that your network has a DHCP server running and that it is configured correctly to assign IP addresses.Public Networks: On public networks, such as coffee shops or libraries, you may not have control over the DHCP server, and thus may not be able to change IP address settings.In conclusion, setting up automatic IP address changes involves configuring your device or network to obtain an IP address from a DHCP server. Whether you're using Windows, macOS, or Linux, the process is relatively straightforward and can be completed in a few steps. Remember to consider your network's configuration and the availability of a DHCP server before making any changes.