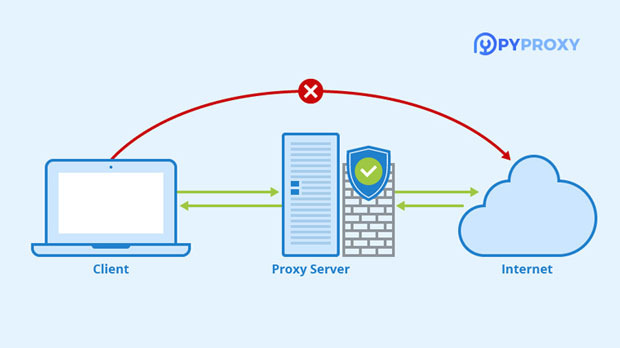
In the digital age, website traffic is a crucial metric for online success. Many businesses and individuals seek ways to boost their website visits, whether for marketing purposes, SEO ranking, or simply to gain visibility. One method that has gained attention is using proxy IPs to artificially inflate website traffic. This article will explore how to effectively use proxy IPs for this purpose, discussing the methods, tools, and ethical considerations involved.Understanding Proxy IPsWhat is a Proxy IP?A proxy IP acts as an intermediary between your device and the internet. When you use a proxy server, your internet requests are routed through the proxy, which masks your real IP address. This allows you to appear as though you are browsing from a different location, making proxies useful for various purposes, including anonymity, bypassing geographical restrictions, and, as we will discuss, increasing website traffic.Types of Proxies1. HTTP Proxies: Ideal for web browsing, these proxies handle HTTP requests and can cache content for faster access.2. HTTPS Proxies: These provide a secure connection by encrypting data, making them suitable for sensitive transactions.3. SOCKS Proxies: More versatile, SOCKS proxies can handle any type of traffic, including web browsing, email, and file transfers.4. Residential Proxies: These proxies use IP addresses assigned by Internet Service Providers (ISPs), making them appear more legitimate to websites.5. Datacenter Proxies: These are not affiliated with ISPs and are often faster but can be more easily detected as proxies.Why Use Proxy IPs to Increase Traffic?Using proxy IPs to increase website traffic can offer several benefits:1. Anonymity: By masking your real IP address, you can avoid detection from analytics tools and prevent your traffic from being flagged as suspicious.2. Geographic Diversity: Proxies allow you to simulate traffic from different locations, which can be useful for testing how your website performs in various regions.3. Avoiding Rate Limits: Many websites impose rate limits on how many requests can come from a single IP address. Using multiple proxies can help you bypass these restrictions.4. SEO Benefits: Increased traffic can improve your website's search engine ranking, as search engines may interpret higher traffic as a sign of relevance and authority.How to Use Proxy IPs for Traffic GenerationStep 1: Choose the Right Proxy ProviderSelecting a reliable proxy provider is crucial for effective traffic generation. Look for providers that offer:- High Anonymity: Ensure that the proxies are undetectable and can bypass security measures.- Diverse IP Locations: Choose a provider with a wide range of IP addresses from different geographic locations.- Good Speed: Fast proxies will ensure that your requests are processed quickly, leading to a better user experience.- Residential Proxies: If possible, opt for residential proxies, as they are less likely to be flagged by websites.Step 2: Gather Your ToolsTo effectively use proxy IPs for traffic generation, you will need some tools:1. Proxy Management Software: Tools can help manage multiple proxies and route your traffic through them efficiently.2. Web Scraping Tools: If you're looking to automate the process, consider using web scraping tools like "Scrapy," "Beautiful Soup," or "Selenium." These tools can simulate user behavior and help generate traffic.3. Traffic Generation Software: There are specialized tools designed to simulate traffic. Some popular options include "TrafficBot" or "TrafficWave."Step 3: Configure Your Proxy SettingsOnce you have your proxies and tools ready, it’s time to configure your settings:1. Install Proxy Management Software: Download and install your chosen proxy management tool.2. Input Proxy Information: Enter the IP addresses and port numbers of the proxies you intend to use. If your proxies require authentication, input the necessary credentials.3. Test Proxies: Before starting your traffic generation, test each proxy to ensure they are functioning correctly. Most proxy management tools will have a built-in testing feature.Step 4: Create a Traffic Generation StrategyDeveloping a strategy for generating traffic is essential for ensuring effectiveness. Here are some methods to consider:1. Simulate User Behavior: Use web scraping tools to mimic real user interactions, such as clicking links, scrolling, and filling out forms. This makes the traffic appear more legitimate.2. Vary Your Requests: Avoid sending identical requests in quick succession. Change the user agent, referrer, and other parameters to make your traffic appear organic.3. Schedule Traffic Generation: Use scheduling features in your software to spread out traffic generation over time. This can help avoid detection and reduce the risk of being flagged.4. Target Specific Pages: Focus on driving traffic to specific pages on your website that you want to promote.Step 5: Monitor Your ResultsAfter implementing your traffic generation strategy, it’s crucial to monitor the results:1. Use Analytics Tools: Set up Google Analytics or similar tools to track the traffic coming to your website. Monitor metrics such as page views, bounce rates, and session duration.2. Adjust Your Strategy: Based on the data collected, adjust your strategy as needed. If certain proxies are underperforming, consider replacing them.3. Check for Detection: Regularly monitor your website’s analytics to ensure that your traffic isn’t being flagged as suspicious. If you notice a significant drop in traffic or engagement, it may be time to reevaluate your approach.Ethical ConsiderationsWhile using proxy IPs to increase website traffic can be effective, it’s essential to consider the ethical implications:1. Compliance with Terms of Service: Many websites have terms of service that prohibit artificial traffic generation. Violating these terms can lead to account bans or legal action.2. Impact on Analytics: Inflating traffic can distort your website’s analytics, making it difficult to understand genuine user behavior and preferences.3. Reputation Risks: If detected, the use of proxy IPs for traffic generation can harm your reputation and credibility in your industry.4. Consider Alternative Strategies: Instead of solely relying on proxy IPs, consider investing in legitimate marketing strategies, such as SEO, content marketing, and social media promotion, to drive organic traffic to your website.Using proxy IPs to increase website traffic can be an effective tactic when done correctly. By selecting the right proxies, gathering the necessary tools, and developing a thoughtful strategy, you can generate traffic while maintaining anonymity. However, it’s crucial to weigh the ethical implications and ensure compliance with relevant terms of service. Ultimately, while proxy IPs can provide a temporary boost in traffic, focusing on sustainable and legitimate marketing practices will yield long-term success for your online presence.
In today's digital landscape, the use of proxy servers has become increasingly popular among internet users seeking enhanced privacy and access to restricted content. However, not all proxy IPs are reliable or functional. Testing whether a proxy IP is usable is crucial to ensure a smooth browsing experience. This article will guide you through various methods to test the usability of a proxy IP, providing you with the knowledge needed to choose the right proxy for your needs.Understanding Proxy ServersBefore diving into the testing methods, it's essential to understand what a proxy server is and how it works.What is a Proxy Server?A proxy server acts as an intermediary between your device and the internet. When you use a proxy, your internet requests are routed through the proxy server, which then communicates with the target website. This process masks your real IP address and can help you bypass geographical restrictions.Types of Proxy Servers1. HTTP Proxies: Primarily used for web browsing, these proxies handle HTTP requests. They are suitable for general web traffic but do not encrypt data.2. HTTPS Proxies: These proxies encrypt your data, making them more secure than standard HTTP proxies. They are ideal for sensitive transactions.3. SOCKS Proxies: SOCKS proxies can handle any type of traffic, including email and file transfers. They are versatile but may be slower than HTTP or HTTPS proxies.4. Transparent Proxies: These proxies do not modify requests and are often used for caching and filtering content but do not provide anonymity.5. Anonymous Proxies: These proxies hide your IP address but may still reveal that you are using a proxy.6. Elite Proxies: These provide the highest level of anonymity by not revealing your IP address or the fact that you are using a proxy.Why Test Proxy IPs?Testing proxy IPs is essential for several reasons:1. Reliability: A reliable proxy ensures that your internet connection remains stable and fast.2. Anonymity: Testing helps verify that the proxy effectively masks your IP address.3. Access to Content: Some proxies may not work with specific websites or services, particularly those that are geo-restricted.4. Security: Ensuring that a proxy is secure helps protect your data from potential threats.Methods to Test Proxy IPsHere are several effective methods to test if a proxy IP is usable:Method 1: Using Online Proxy TestersNumerous online tools can help you test the usability of a proxy IP. These tools check whether the proxy is functioning correctly and whether it can mask your IP address. Here’s how to use them:1. Find a Proxy Tester: Search for online proxy testing tools like "WhatIsMyIP.com," "Proxy Checker," or "Proxy Test."2. Input Proxy Information: Enter the proxy IP address and port number into the tester.3. Run the Test: Click the test button to see if the proxy is active and functioning. The tool will display whether your real IP is masked and the response time of the proxy.4. Analyze Results: Look for results indicating whether the proxy is working and how quickly it responds. A high response time may indicate a slow or overloaded proxy.Method 2: Manual TestingIf you prefer a hands-on approach, you can manually test a proxy IP using your web browser or command line. Here’s how:Testing with a Web Browser1. Open Browser Settings: Access your browser’s settings and navigate to the network or proxy settings.2. Configure Proxy: Enter the proxy IP address and port number in the designated fields.3. Save Settings: Save your changes and restart the browser.4. Visit a Website: Try to access a website. If the page loads successfully and your IP is masked (check with "WhatIsMyIP.com"), the proxy is functional.5. Check Speed: Note the loading speed. A slow response may indicate issues with the proxy.Testing with Command LineFor more technical users, the command line can be a powerful tool for testing proxies.1. Open Command Prompt or Terminal: Access your command line interface.2. Use Curl Command: Type the following command to test the proxy:```bashcurl -x http://[proxy_ip]:[port] http://www.example.com```Replace `[proxy_ip]` and `[port]` with your proxy's details.3. Analyze Output: If the command returns the HTML content of the requested page, the proxy is working.Method 3: Testing with Software ToolsVarious software applications are designed to test proxy servers. These tools often provide more detailed information about the proxy's performance and reliability.1. Download Proxy Testing Software: Look for reputable proxy testing tools like "ProxyCap," "Proxifier," or "Proxy Checker."2. Configure the Proxy Settings: Enter the proxy IP and port number in the software.3. Run Tests: Use the software’s features to test the proxy’s speed, anonymity, and reliability.4. Review Results: Analyze the results provided by the software, which may include response times, uptime, and anonymity levels.Method 4: Checking for IP BlacklistingSome proxies may be blacklisted by websites, preventing access. To check if your proxy IP is blacklisted:1. Use Blacklist Checkers: Search for online tools that check IP blacklists.2. Enter Proxy IP: Input the proxy IP address into the tool.3. Review Results: The tool will indicate whether the IP is blacklisted on any major databases.Method 5: Testing for Geo-RestrictionsIf you are using a proxy to access geo-restricted content, it’s essential to verify that the proxy can bypass these restrictions.1. Identify Restricted Content: Choose a website or service that is known to be geo-restricted in your location.2. Configure Proxy: Set up the proxy in your browser or application.3. Attempt Access: Try to access the restricted content. If successful, the proxy is functioning as intended.4. Check IP Location: Use an IP lookup tool to verify that your IP reflects the proxy's location.Best Practices for Proxy TestingTo ensure effective testing of proxy IPs, consider the following best practices:1. Use Multiple Testing Methods: Combine different testing methods for a comprehensive evaluation of the proxy.2. Regularly Test Proxies: Proxy IPs can change in reliability and performance. Regular testing ensures you always have a usable proxy.3. Choose Quality Proxies: Opt for reputable proxy providers to minimize the chances of encountering unusable proxies.4. Keep Security in Mind: Always prioritize proxies that offer encryption and security features, especially when handling sensitive data.5. Stay Informed: Keep up with the latest developments in proxy technology and best practices to maximize your online safety.Testing the usability of a proxy IP is essential for anyone looking to maintain privacy and access restricted content online. By utilizing online testers, manual methods, software tools, and checking for blacklisting, you can effectively determine whether a proxy IP is functional. Following best practices ensures you have a reliable and secure browsing experience. With the right knowledge and tools, you can navigate the world of proxies with confidence, enhancing your online activities while protecting your personal information.PYPROXY has a simple and easy-to-use operation page with whitelist, username and password configuration options. Whether you are a novice or an experienced user, you can easily set up and manage to ensure the smooth operation of the proxy service.
In the digital age, protecting your online privacy is more important than ever. One effective way to enhance your privacy while browsing the internet is by using a proxy server. A proxy server acts as an intermediary between your device and the internet, allowing you to mask your IP address and access content that may be restricted based on your geographic location. This article will provide a comprehensive guide on how to set up IP proxy servers in the 360 Browser, a popular web browser known for its speed and security features.Understanding Proxy ServersBefore diving into the specifics of setting up a proxy server in the 360 Browser, it’s essential to understand what a proxy server is and how it works.What is a Proxy Server?A proxy server is a computer or application that serves as a gateway between your device and the internet. When you send a request to access a website, the request first goes to the proxy server, which then forwards it to the target website. The website responds to the proxy server, which in turn sends the data back to you. This process masks your actual IP address, providing anonymity and security.Benefits of Using a Proxy Server1. Enhanced Privacy: By hiding your IP address, a proxy server helps protect your identity online, making it harder for websites and advertisers to track your browsing habits.2. Access to Restricted Content: Proxies can help you bypass geographical restrictions imposed by websites, allowing you to access content that may not be available in your region, such as streaming services or specific websites.3. Improved Security: Some proxy servers offer additional security features, such as filtering out malicious websites and encrypting your internet traffic.4. Bandwidth Control: Proxies can help manage bandwidth usage, making them useful for organizations with multiple users.Setting Up an IP Proxy Server in 360 BrowserUsing a proxy server in the 360 Browser is a straightforward process. Follow these steps to configure your proxy settings effectively.Step 1: Obtain Proxy Server InformationBefore you can configure your proxy settings, you need to gather the necessary information about the proxy server you wish to use:- IP Address: The numerical address of the proxy server.- Port Number: The communication endpoint for the proxy server.- Username and Password: If the proxy requires authentication, you will also need these credentials.You can find proxy servers online, either for free or through paid services. It’s crucial to choose a reliable provider to ensure your security and privacy.Step 2: Open 360 Browser Settings1. Launch 360 Browser: Open the 360 Browser on your device.2. Access Settings: Click on the three horizontal lines (menu icon) in the upper-right corner of the browser window. From the dropdown menu, select “Settings.”Step 3: Navigate to Network Settings1. Find Network Settings: In the Settings menu, scroll down to find the “Advanced” section. Click on it to expand the options.2. Open Proxy Settings: Look for the “Network” or “Proxy” settings option and click on it. This will take you to the proxy configuration page.Step 4: Configure Proxy Settings1. Manual Proxy Setup: In the proxy settings, you will typically see options for “Automatically detect settings,” “Use system proxy settings,” and “Manual proxy configuration.” Select the option for “Manual proxy configuration.”2. Enter Proxy Information: Input the IP address and port number of the proxy server in the designated fields. If your proxy requires authentication, you may also need to enter the username and password.- HTTP Proxy: Enter the IP address and port for HTTP traffic.- HTTPS Proxy: Enter the IP address and port for HTTPS traffic if applicable.- SOCKS Proxy: If you are using a SOCKS proxy, enter the relevant details as well.3. Save Changes: After entering the necessary information, make sure to save your changes. Look for a “Save” or “Apply” button at the bottom of the settings window.Step 5: Test Your Proxy ConnectionOnce you have configured your proxy settings, it’s important to test the connection to ensure it is working correctly.1. Visit an IP Check Website: Open a new tab and visit a website like [WhatIsMyIP.com](https://www.whatismyip.com) to check your IP address.2. Verify IP Address Change: If the proxy is working, the displayed IP address should be different from your original IP address. This indicates that your internet traffic is being routed through the proxy server.3. Access Restricted Content: Try accessing a website or service that was previously restricted in your region. If you can access it, your proxy setup is successful.Step 6: Troubleshooting Common IssuesIf you encounter issues while using a proxy server in 360 Browser, consider the following troubleshooting steps:1. Check Proxy Details: Double-check the IP address, port number, username, and password to ensure they are entered correctly.2. Test Different Proxies: If one proxy server doesn’t work, try using a different one. Some proxies may be down or blocked by certain websites.3. Disable Other Extensions: Sometimes, browser extensions can interfere with proxy settings. Disable any unnecessary extensions and try again.4. Firewall and Antivirus Settings: Ensure that your firewall or antivirus software is not blocking the proxy connection. You may need to add an exception for the 360 Browser.5. Restart the Browser: After making changes to the proxy settings, restart the 360 Browser to apply the new configuration.Best Practices for Using ProxiesTo ensure a smooth and secure browsing experience while using proxy servers, consider the following best practices:1. Choose Reliable Proxy Providers: Always opt for reputable proxy services to ensure your data is secure and your connection is stable.2. Use HTTPS Proxies: Whenever possible, use HTTPS proxies to encrypt your internet traffic, providing an additional layer of security.3. Regularly Update Proxy Settings: Proxy servers can change or become unavailable. Regularly check your proxy settings and update them as needed.4. Monitor Performance: Keep an eye on your browsing speed and connectivity. If you notice significant slowdowns, consider switching to a different proxy server.5. Stay Informed About Legal Implications: Be aware of the legal implications of using proxies in your region, especially for activities like web scraping or accessing restricted content.Setting up an IP proxy server in the 360 Browser can significantly enhance your online privacy and allow you to access restricted content. You can easily configure and test your proxy settings. Remember to choose reliable proxy providers and stay informed about best practices to ensure a secure and efficient browsing experience. With the right setup, you can enjoy the benefits of enhanced anonymity and unrestricted internet access. Whether you are looking to protect your personal information or access geo-restricted content, using a proxy server is a valuable tool in your online toolkit.PYPROXY has a simple and easy-to-use operation page with whitelist, username and password configuration options. Whether you are a novice or an experienced user, you can easily set up and manage to ensure the smooth operation of the proxy service.
In the digital age, privacy and security have become paramount concerns for internet users. One effective way to enhance your online anonymity is by using a proxy server. A proxy server acts as an intermediary between your device and the internet, allowing you to mask your IP address and access content that may be restricted based on your geographic location. This article will guide you through the process of using IP proxy servers in the 360 Browser, a popular web browser known for its speed and security features.What is 360 Browser?360 Browser, developed by Qihoo 360, is a multifunctional web browser that combines various features and tools to enhance user experience. It offers a user-friendly interface, fast browsing speeds, and built-in security features, making it a popular choice among users in China and beyond. One of its notable features is the ability to configure proxy settings, which can help users maintain privacy and access restricted content.Why Use a Proxy Server?Using a proxy server can provide several benefits:1. Enhanced Privacy: By masking your IP address, a proxy server helps protect your identity online, making it harder for websites to track your browsing habits.2. Access to Restricted Content: Proxies can help you bypass geographical restrictions imposed by websites, allowing you to access content that may not be available in your region.3. Improved Security: Some proxy servers offer additional security features, such as filtering out malicious websites and encrypting your internet traffic.4. Bandwidth Control: Proxies can help manage bandwidth usage, making them useful for organizations with multiple users.How to Set Up IP Proxy Servers in 360 BrowserSetting up an IP proxy server in 360 Browser is a straightforward process. Follow these steps to configure your proxy settings effectively.Step 1: Obtain Proxy Server InformationBefore you can configure your proxy settings, you need to have the following information about the proxy server you wish to use:- IP Address: The numerical address of the proxy server.- Port Number: The communication endpoint for the proxy server.- Username and Password: If the proxy requires authentication, you will also need these credentials.You can find proxy servers online, either for free or through paid services. Make sure to choose a reliable provider to ensure your security and privacy.Step 2: Open 360 Browser Settings1. Launch 360 Browser: Open the 360 Browser on your device.2. Access Settings: Click on the three horizontal lines (menu icon) in the upper-right corner of the browser window. From the dropdown menu, select “Settings.”Step 3: Navigate to Network Settings1. Find Network Settings: In the Settings menu, scroll down to find the “Advanced” section. Click on it to expand the options.2. Open Proxy Settings: Look for the “Network” or “Proxy” settings option and click on it. This will take you to the proxy configuration page.Step 4: Configure Proxy Settings1. Manual Proxy Setup: In the proxy settings, you will typically see options for “Automatically detect settings,” “Use system proxy settings,” and “Manual proxy configuration.” Select the option for “Manual proxy configuration.”2. Enter Proxy Information: Input the IP address and port number of the proxy server in the designated fields. If your proxy requires authentication, you may also need to enter the username and password.- HTTP Proxy: Enter the IP address and port for HTTP traffic.- HTTPS Proxy: Enter the IP address and port for HTTPS traffic if applicable.- SOCKS Proxy: If you are using a SOCKS proxy, enter the relevant details as well.3. Save Changes: After entering the necessary information, make sure to save your changes. Look for a “Save” or “Apply” button at the bottom of the settings window.Step 5: Test Your Proxy ConnectionOnce you have configured your proxy settings, it’s important to test the connection to ensure it is working correctly.1. Visit an IP Check Website: Open a new tab and visit a website to check your IP address.2. Verify IP Address Change: If the proxy is working, the displayed IP address should be different from your original IP address. This indicates that your internet traffic is being routed through the proxy server.3. Access Restricted Content: Try accessing a website or service that was previously restricted in your region. If you can access it, your proxy setup is successful.Step 6: Troubleshooting Common IssuesIf you encounter issues while using a proxy server in 360 Browser, consider the following troubleshooting steps:1. Check Proxy Details: Double-check the IP address, port number, username, and password to ensure they are entered correctly.2. Test Different Proxies: If one proxy server doesn’t work, try using a different one. Some proxies may be down or blocked by certain websites.3. Disable Other Extensions: Sometimes, browser extensions can interfere with proxy settings. Disable any unnecessary extensions and try again.4. Firewall and Antivirus Settings: Ensure that your firewall or antivirus software is not blocking the proxy connection. You may need to add an exception for the 360 Browser.5. Restart the Browser: After making changes to the proxy settings, restart the 360 Browser to apply the new configuration.Best Practices for Using ProxiesTo ensure a smooth and secure browsing experience while using proxy servers, consider the following best practices:1. Choose Reliable Proxy Providers: Always opt for reputable proxy services to ensure your data is secure and your connection is stable.2. Use HTTPS Proxies: Whenever possible, use HTTPS proxies to encrypt your internet traffic, providing an additional layer of security.3. Regularly Update Proxy Settings: Proxy servers can change or become unavailable. Regularly check your proxy settings and update them as needed.4. Monitor Performance: Keep an eye on your browsing speed and connectivity. If you notice significant slowdowns, consider switching to a different proxy server.5. Stay Informed About Legal Implications: Be aware of the legal implications of using proxies in your region, especially for activities like web scraping or accessing restricted content.Using an IP proxy server in the 360 Browser can significantly enhance your online privacy and allow you to access restricted content. You can easily configure and test your proxy settings. Remember to choose reliable proxy providers and stay informed about best practices to ensure a secure and efficient browsing experience. With the right setup, you can enjoy the benefits of enhanced anonymity and unrestricted internet access.PYPROXY has a simple and easy-to-use operation page with whitelist, username and password configuration options. Whether you are a novice or an experienced user, you can easily set up and manage to ensure the smooth operation of the proxy service.
In the realm of web scraping, rotating proxies have emerged as indispensable tools for optimizing data acquisition processes, enhancing performance, and ensuring the reliability of data extraction operations. By enabling users to switch between multiple IP addresses, rotating proxies facilitate seamless and efficient web scraping activities, allowing businesses to access data from target websites anonymously, avoid detection, and maintain uninterrupted data extraction processes. In this article, we explore the functionalities, benefits, and practical applications of rotating proxies in web scraping, highlighting strategies and use cases for maximizing data acquisition efficiency and driving informed decision-making through effective web scraping practices.Best Practices for Implementing Rotating Proxies in Web Scraping:Proxy Rotation Configuration: Configure rotating proxies with appropriate rotation intervals, IP diversity settings, and rotation methods to ensure seamless IP switching, prevent detection, and maintain uninterrupted data extraction processes in web scraping operations.Request Throttling and Management: Implement rate-limiting strategies, throttle request frequencies, and manage scraping volumes when using rotating proxies for web scraping, optimizing data extraction processes, reducing server loads, and ensuring compliance with website usage policies.Proxy Pool Monitoring: Regularly monitor and manage proxy pools to ensure IP diversity, high availability, and optimal performance in web scraping operations, selecting reputable rotating proxy providers with reliable infrastructure and responsive support services to maximize scraping efficiency.Leveraging Rotating Proxies for Effective Web Scraping Practices:Competitive Intelligence: Web scrapers leverage rotating proxies to extract competitive data, monitor pricing trends, analyze market dynamics, and gain competitive insights from competitor websites, enabling businesses to optimize pricing strategies, identify market opportunities, and enhance competitive positioning.Market Research and Analysis: By scraping data from industry websites, social media platforms, and online forums using rotating proxies, businesses can gather market intelligence, track consumer sentiments, analyze trends, and forecast market developments to inform strategic decision-making and market positioning.Content Aggregation and Monitoring: Rotating proxies enable web scrapers to aggregate content, monitor news updates, and track industry developments from multiple sources, curating relevant information, and staying informed about market trends, competitor activities, and emerging opportunities for business growth.In conclusion, rotating proxies play a vital role in enhancing web scraping efficiency, enabling businesses to extract data reliably, gain competitive insights, and drive informed decision-making processes effectively. By implementing best practices, ethical guidelines, and compliance measures when using rotating proxies for web scraping, businesses can optimize their data acquisition strategies, mitigate risks, and unlock the full potential of web scraping for competitive advantage and business growth in today's data-driven landscape.
In the world of internet privacy and security, utilizing proxy servers has become a common practice. One of the popular formats for proxy IPs is the SK5 format, which is often used for various applications and services. However, there may be instances where you need to convert SK5 proxy IPs to other formats for compatibility with different software or systems. This article will guide you through the process of converting SK5 proxy IPs to other formats, explaining the significance of each format and providing practical steps for conversion.Understanding Proxy FormatsBefore diving into the conversion process, it’s important to understand what SK5 proxy IPs are and how they differ from other formats.What is SK5 Proxy Format?The SK5 proxy format typically consists of the following components:- IP Address: The numerical label assigned to each device connected to a computer network.- Port Number: The communication endpoint for the proxy server.- Username and Password: Optional authentication credentials for accessing the proxy.An example of an SK5 proxy might look like this:```192.168.1.1:8080:username:password```Common Proxy Formats1. HTTP/HTTPS Proxy: This format is used for web traffic. It usually includes just the IP address and port number, such as `192.168.1.1:8080`.2. SOCKS Proxy: This versatile format can handle various types of traffic, including web browsing and file transfers. It is typically represented as `socks5://192.168.1.1:1080`.3. URL Format: Some applications require proxy settings in a URL format, such as `http://username:password@192.168.1.1:8080`.Why Convert SK5 Proxy IPs?There are several reasons you might need to convert SK5 proxy IPs to other formats:- Compatibility: Different applications or services may require proxy settings in specific formats.- Ease of Use: Some formats are easier to input or manage within certain software.- Automation: If you are using scripts or automated tools, converting proxies into a consistent format can streamline processes.Steps to Convert SK5 Proxy IPsStep 1: Identify the Required FormatBefore converting, identify the format you need. Here are common formats you might convert to:- HTTP/HTTPS: For web browsers and applications that only support HTTP proxies.- SOCKS: For applications that require SOCKS5 proxies.- URL Format: For services that require authentication in the URL.Step 2: Extract Components from SK5 FormatTo convert an SK5 proxy, you first need to extract its components. Let’s break down the example SK5 proxy:```192.168.1.1:8080:username:password```From this, you can identify:- IP Address: `192.168.1.1`- Port Number: `8080`- Username: `username`- Password: `password`Step 3: Convert to Desired FormatConverting to HTTP/HTTPS FormatIf you want to convert the SK5 proxy to HTTP format, simply use the IP address and port number:```192.168.1.1:8080```If authentication is required, you can use the URL format:```http://username:password@192.168.1.1:8080```Converting to SOCKS FormatTo convert to SOCKS5 format, you can use the following representation:```socks5://192.168.1.1:8080```If authentication is needed:```socks5://username:password@192.168.1.1:8080```Converting to URL FormatFor applications that require the proxy in URL format, you can utilize the following structure:```http://username:password@192.168.1.1:8080```Step 4: Test the Converted ProxyOnce you have converted the SK5 proxy to the desired format, it’s crucial to test it to ensure it works correctly. Here’s how to do that:1. Input the Proxy: Enter the converted proxy settings into the application or service you intend to use.2. Check Connectivity: Use a service to verify that your IP address changes when you connect through the proxy.3. Troubleshoot Issues: If the proxy does not work, double-check the format and ensure that the IP address, port, username, and password are correct.Tools for Proxy ConversionIf you frequently convert proxy formats, consider using tools or scripts to automate the process. Here are some options:1. Online Proxy Converters: Several websites offer online tools to convert proxy settings. Simply input the SK5 format, and the tool will provide the converted formats.2. Scripts: If you are comfortable with programming, you can write a simple script in languages like Python or JavaScript to automate the conversion process.3. Proxy Management Software: Some applications designed for managing proxies offer built-in conversion tools, allowing you to easily switch between formats.Best Practices for Using ProxiesWhen using proxies, especially for sensitive tasks, keep the following best practices in mind:1. Choose Reliable Proxies: Always use proxies from reputable providers to ensure security and reliability.2. Regularly Update Credentials: If you are using authenticated proxies, regularly update your username and password to maintain security.3. Monitor Performance: Keep an eye on the performance of your proxies. If you notice slow speeds or connectivity issues, consider switching to a different proxy.4. Be Aware of Legal Implications: Understand the legal implications of using proxies in your jurisdiction, especially for activities like web scraping or bypassing geo-restrictions.Converting SK5 proxy IPs to other formats is a straightforward process that can enhance your online experience by providing compatibility with various applications and services. You can easily extract components from the SK5 format and convert them to HTTP, SOCKS, or URL formats. Additionally, utilizing tools and scripts can streamline the conversion process, making it more efficient. Always remember to choose reliable proxies and adhere to best practices to ensure a secure and effective online presence.PYPROXY has a simple and easy-to-use operation page with whitelist, username and password configuration options. Whether you are a novice or an experienced user, you can easily set up and manage to ensure the smooth operation of the proxy service.
In an era where online privacy and security are paramount, using a proxy server has become a popular method for individuals and businesses alike. A proxy server acts as an intermediary between your computer and the internet, allowing you to mask your IP address and access content that may be restricted in your region. This article will guide you through the process of setting up an IP proxy server in your browser, covering popular browsers like Google Chrome, Mozilla Firefox, and Microsoft Edge.What is a Proxy Server?Before we dive into the setup process, it’s essential to understand what a proxy server is. A proxy server is a computer or application that acts as a gateway between your device and the internet. When you use a proxy, your internet requests are routed through the proxy server, which can change your IP address and provide anonymity. This can be particularly useful for:1. Enhancing Privacy: By masking your actual IP address, proxies help protect your identity online.2. Bypassing Geo-Restrictions: Proxies can allow you to access content that is not available in your geographic location, such as streaming services or specific websites.3. Improving Security: Some proxies offer additional security features, such as filtering out malicious websites.Types of Proxy ServersThere are several types of proxy servers, each serving different purposes:1. HTTP Proxies: These are used for web traffic and are suitable for browsing the internet.2. HTTPS Proxies: These provide a secure connection for encrypted traffic, ideal for sensitive transactions.3. SOCKS Proxies: These can handle any type of traffic, making them versatile for various applications.4. Transparent Proxies: These do not modify requests and are often used for caching and filtering content.How to Set Up a Proxy Server in Your BrowserSetting Up a Proxy in Google Chrome1. Open Chrome Settings: Launch Google Chrome and click on the three vertical dots in the upper-right corner. Select “Settings” from the dropdown menu.2. Access Advanced Settings: Scroll down and click on “Advanced” to expand the advanced settings menu.3. Open Proxy Settings: Under the “System” section, click on “Open your computer’s proxy settings.” This will direct you to the proxy settings of your operating system.4. Configure Proxy Settings:- Windows: In the Internet Properties window, go to the “Connections” tab and click on “LAN settings.” Here, you can check the box for “Use a proxy server for your LAN” and enter the proxy server’s IP address and port number.- macOS: In the Network window, select your network connection, click on “Advanced,” and navigate to the “Proxies” tab. Here, you can enter the proxy settings.5. Save Changes: Click “OK” to save your settings, then restart Chrome to apply the changes.Setting Up a Proxy in Mozilla Firefox1. Open Firefox Options: Launch Mozilla Firefox and click on the three horizontal lines in the upper-right corner. Select “Options” from the dropdown menu.2. Access Network Settings: Scroll down to the “Network Settings” section and click on “Settings.”3. Configure Proxy Settings: In the Connection Settings window, you have several options:- No Proxy: Direct connection to the internet.- Use system proxy settings: Use the proxy settings configured in your operating system.- Manual proxy configuration: Enter the proxy server’s IP address and port number in the appropriate fields (HTTP Proxy, SSL Proxy, etc.).4. Save Changes: Click “OK” to save your settings. Restart Firefox to ensure the new settings take effect.Setting Up a Proxy in Microsoft Edge1. Open Edge Settings: Launch Microsoft Edge and click on the three horizontal dots in the upper-right corner. Select “Settings.”2. Access Privacy, Search, and Services: In the left sidebar, click on “Privacy, search, and services.”3. Open Proxy Settings: Scroll down to the “More settings” section and click on “Proxy setup.” This will redirect you to your operating system’s proxy settings.4. Configure Proxy Settings:- Windows: Similar to Chrome, go to the “Connections” tab in the Internet Properties window and click on “LAN settings” to enter your proxy settings.- macOS: Follow the same steps as in Chrome to configure your proxy settings.5. Save Changes: Click “OK” to save your settings, and then restart Edge.Testing Your Proxy ConnectionOnce you have configured your proxy settings, it’s essential to test whether the proxy is working correctly:1. Check Your IP Address: Visit a website to see your current IP address. If the proxy is working, the displayed IP address should be different from your actual IP address.2. Access Restricted Content: Try accessing a website that was previously restricted in your region. If you can access it, your proxy setup is successful.3. Monitor Performance: Keep an eye on your browsing speed. Proxies can sometimes slow down your internet connection, so it’s essential to choose a reliable proxy server.Common Issues and TroubleshootingWhile setting up a proxy server in your browser is relatively straightforward, you may encounter some issues. Here are common problems and their solutions:1. Proxy Not WorkingIf your proxy is not functioning, check the following:- Correct IP and Port: Ensure that you have entered the correct IP address and port number for the proxy server.- Proxy Server Status: The proxy server may be down. Try using a different proxy server to see if the issue persists.- Firewall Settings: Your firewall or antivirus software may be blocking the proxy connection. Check the settings and allow the proxy if necessary.2. Slow Internet SpeedIf you notice a decrease in internet speed after configuring the proxy:- Choose a Faster Proxy: Some proxies can be slower than others. Research and choose a reputable proxy provider known for speed.- Check Network Connection: Ensure that your internet connection is stable and functioning correctly.3. Unable to Access Certain WebsitesSome websites may block access from known proxy IP addresses:- Try Different Proxies: If a specific website is not accessible, try using a different proxy server or a residential proxy, which is less likely to be blocked.Setting up an IP proxy server in your browser can significantly enhance your online privacy and allow you to access restricted content. By following the steps outlined for popular browsers like Google Chrome, Mozilla Firefox, and Microsoft Edge, you can easily configure a proxy server to suit your needs. Remember to test your connection and troubleshoot any issues that may arise. With the right proxy settings, you can enjoy a more secure and flexible browsing experience. Always choose reputable proxy services to ensure your online safety and privacy.PYPROXY's versatility makes it an ideal choice for all walks of life. PYPROXY can provide you with suitable solutions for areas such as advertising verification, price monitoring, market research, e-commerce, social media, etc. Their proxy services can meet different business needs, help you improve efficiency and achieve better business results.
Web scraping has evolved into a critical tool for extracting data, automating tasks, and gaining insights across various industries. Rotating proxies are instrumental in enhancing web scraping operations by enabling users to switch between different IP addresses, preventing detection, and ensuring smooth and uninterrupted data extraction from target websites. In this article, we delve into the functionalities, benefits, and best practices of utilizing rotating proxies for web scraping, exploring how businesses can optimize their data acquisition processes and drive informed decision-making through effective web scraping strategies.Understanding Rotating Proxies in Web Scraping:Rotating proxies, also known as rotating IP proxies, are intermediary servers that automatically switch between multiple IP addresses, providing users with a diverse pool of IPs to mask their identity, circumvent restrictions, and maintain anonymity during web scraping activities. By rotating through a series of IP addresses, web scrapers can distribute requests, avoid IP bans, and overcome anti-scraping mechanisms implemented by target websites, ensuring reliable and efficient data extraction processes.Key Features of Rotating Proxies for Web Scraping:IP Rotation: Rotating proxies offer IP rotation capabilities, allowing users to cycle through different IP addresses at set intervals to prevent detection, evade bans, and maintain continuous data extraction operations without interruptions.Unblocking and Geo-Spoofing: Rotating proxies enable users to bypass geo-restrictions, access region-locked content, and simulate diverse user locations by rotating through a pool of IPs from various geographic locations, expanding data sourcing capabilities and enhancing data quality for analysis.Anti-Detection Mechanisms: Rotating proxies help web scrapers evade detection by anti-scraping mechanisms, such as CAPTCHA challenges, bot detection scripts, and rate-limiting algorithms, by dynamically changing IP addresses and emulating human-like browsing behaviors to extract data undetectable.Benefits of Using Rotating Proxies for Web Scraping:Enhanced Anonymity and Security: Rotating proxies provide enhanced anonymity and security for web scraping activities by masking user identities, encrypting data transmissions, and mitigating the risks of IP blocking, bot detection, and security vulnerabilities, ensuring a secure and confidential scraping environment.Improved Data Extraction Efficiency: Rotating proxies support efficient data extraction by rotating through a pool of diverse IP addresses, distributing requests, and preventing IP bans, enabling web scrapers to extract large volumes of data from multiple sources seamlessly and reliably.Scalability and Reliability: Rotating proxies offer scalability and reliability in web scraping operations by providing a continuous supply of fresh IP addresses, ensuring high availability, IP diversity, and optimal performance for data acquisition processes across various websites and platforms.In conclusion, rotating proxies play a crucial role in enhancing web scraping efficiency, enabling businesses to extract data reliably, gain competitive insights, and drive informed decision-making processes effectively. By implementing best practices, ethical guidelines, and compliance measures when using rotating proxies for web scraping, businesses can optimize their data acquisition strategies, mitigate risks, and unlock the full potential of web scraping for competitive advantage and business growth in today's data-driven landscape.
In today’s digital landscape, mobile devices are essential tools for browsing the internet, accessing social media, and conducting business. Many users opt to use proxy servers for various reasons, including enhanced privacy, improved security, and access to restricted content. However, configuring a proxy server on a mobile device can be tricky, especially when it comes to dialing settings. This article will provide a comprehensive guide on how to modify proxy IP settings on your mobile phone, as well as how to handle dialing configurations.Understanding Proxy ServersBefore we delve into the steps for modifying proxy settings, it’s important to understand what a proxy server is and why you might want to use one. A proxy server acts as an intermediary between your device and the internet. When you connect to a website through a proxy server, your requests are routed through the proxy, which masks your IP address and can help you maintain anonymity online.Benefits of Using Proxy Servers1. Anonymity: By hiding your real IP address, proxies make it difficult for websites to track your online activities.2. Access to Restricted Content: Proxies allow users to bypass geographical restrictions, enabling access to content that may be blocked in certain regions.3. Improved Security: Using a proxy can add an extra layer of security, especially when connecting to public Wi-Fi networks.4. Web Scraping: Businesses often use proxies for web scraping to gather data without being blocked.Why Modify Proxy IP Settings on MobileThere are several reasons you might want to modify proxy IP settings on your mobile device:1. Changing Locations: If you move to a different region or country, you may need to change your proxy settings to access local content.2. Improving Speed: Sometimes, certain proxies may be slower than others. Switching to a faster proxy can enhance your browsing experience.3. Bypassing Restrictions: If a particular proxy is blocked, you may need to find a new one to regain access to certain websites.Step-by-Step Guide to Modify Proxy IP on Mobile PhonesFor Android Devices1. Open Settings: Start by navigating to the "Settings" app on your Android device.2. Network & Internet: Tap on "Network & Internet" or "Connections," depending on your device model.3. Wi-Fi Settings: Select "Wi-Fi" and connect to the network you wish to modify.4. Modify Network: Long-press the Wi-Fi network name and select "Modify network" or "Manage network settings."5. Advanced Options: Scroll down to find "Advanced options" and tap on it.6. Proxy Settings: In the Proxy section, select "Manual" to enter your proxy settings.7. Enter Proxy IP and Port: Input the proxy IP address and port number provided by your proxy service. For example, if your proxy IP is `192.168.1.100` and the port is `8080`, enter these values.8. Save Changes: After entering the details, save your changes by tapping "Save" or "Connect."9. Testing the Proxy: Open your browser and check if the proxy is working properly by visiting a website.For iOS Devices (iPhone/iPad)1. Open Settings: Launch the "Settings" app on your iPhone or iPad.2. Wi-Fi Settings: Tap on "Wi-Fi" and ensure you are connected to the desired network.3. Network Information: Tap the "i" icon next to the Wi-Fi network you are connected to.4. HTTP Proxy: Scroll down to find the "HTTP Proxy" section.5. Manual Configuration: Select "Manual" to enter your proxy settings.6. Enter Proxy IP and Port: Fill in the "Server" field with the proxy IP address and "Port" field with the corresponding port number.7. Authentication (if required): If your proxy requires authentication, enter the username and password.8. Save Changes: Tap "Back" to save your changes automatically.9. Testing the Proxy: Open Safari or any other browser to verify that the proxy is working correctly.Dialing Configuration for Proxy ServersWhen modifying proxy settings, especially on mobile devices, you may encounter the term "dialing configuration." This typically refers to the settings used to establish a connection to the internet, particularly for mobile data networks. Here’s how to configure dialing settings on your mobile device:For Android Devices1. Open Settings: Go to the "Settings" app.2. Mobile Networks: Tap on "Network & Internet" and then "Mobile network."3. Access Point Names (APN): Select "Access Point Names" to see the list of existing APNs.4. Create New APN: Tap the "+" icon to create a new APN.5. Enter APN Settings: Fill in the required fields, including Name, APN, Proxy, Port, Username, and Password. These details can usually be obtained from your mobile service provider.6. Save the APN: Once you have entered all the necessary information, save the APN settings.7. Select the New APN: Make sure to select the new APN you created to activate it.For iOS Devices1. Open Settings: Launch the "Settings" app.2. Cellular: Tap on "Cellular" and then "Cellular Data Options."3. Cellular Data Network: Tap on "Cellular Data Network" to access the APN settings.4. Enter APN Settings: Fill in the APN, Username, Password, and any other required fields. Again, these details can be obtained from your mobile service provider.5. Save Changes: The settings are saved automatically, so you can simply go back to the main settings.Troubleshooting Proxy IssuesIf you encounter issues after modifying your proxy settings, here are some troubleshooting tips:1. Check Proxy IP and Port: Double-check that you have entered the correct IP address and port number. A small typo can prevent the proxy from working.2. Test Different Proxies: If one proxy isn’t working, try using a different one. Sometimes, proxies can go down or become unresponsive.3. Disable Other Network Settings: If you use a VPN in conjunction with a proxy, disable the VPN temporarily to see if it resolves the issue.4. Restart Your Device: A simple restart can often resolve connectivity issues.5. Contact Support: If you are using a paid proxy service, reach out to their support team for assistance.Modifying proxy IP settings on your mobile device is a straightforward process that can significantly enhance your online experience. Whether you are looking to improve your privacy, access restricted content, or simply switch to a faster proxy, following the steps outlined in this article will help you configure your settings effectively. Additionally, understanding dialing configurations can ensure that your mobile data connection works seamlessly with your proxy settings. Remember to troubleshoot any issues that arise and keep your proxy IPs updated for optimal performance. With the right setup, you can enjoy a secure and unrestricted browsing experience on your mobile device.
In today's interconnected world, many users rely on proxy servers for enhanced privacy, security, and access to restricted content. However, when configuring a proxy server, you may encounter an error stating that the "proxy server IP cannot be empty." This issue can be frustrating, especially if you depend on proxies for your online activities. In this article, we will explore the reasons behind this error, its implications, and how to resolve it effectively.Understanding Proxy ServersBefore diving into the issue, it’s essential to understand what a proxy server is and how it functions. A proxy server acts as an intermediary between your device and the internet. When you send a request to access a website, the request goes through the proxy server, which then forwards it to the intended destination. This process masks your IP address, providing anonymity and security while browsing.Reasons for Using Proxy Servers1. Anonymity: Proxy servers hide your real IP address, making it difficult for websites to track your online activities.2. Access to Restricted Content: They enable users to bypass geographical restrictions, allowing access to content that may be blocked in certain regions.3. Improved Security: Proxies can provide an extra layer of security, especially when using public Wi-Fi networks.4. Web Scraping: Many businesses use proxies for web scraping, allowing them to gather data without being blocked.Common Proxy Configuration IssuesWhen setting up a proxy server, users may encounter various issues, one of which is the error indicating that the "proxy server IP cannot be empty." This error typically arises during the configuration process, and it can occur for several reasons.Reasons for the Error1. Incomplete Configuration: The most common reason for this error is that the user has not entered a valid IP address in the proxy settings.2. Software Glitches: Sometimes, the application or browser you are using may have a glitch that prevents it from recognizing the entered IP address.3. Network Issues: Network connectivity problems can also lead to configuration errors, making it seem like the IP address field is empty.4. Incorrect Proxy Type: If you are trying to configure a proxy type that requires specific settings (e.g., SOCKS5 vs. HTTP), entering the wrong details can trigger this error.Steps to Resolve the IssueIf you encounter the "proxy server IP cannot be empty" error, follow these steps to resolve the issue:Step 1: Verify Proxy Settings1. Open Proxy Settings: Depending on your operating system or application, navigate to the proxy settings section. This might be found in the network settings of your browser or application.2. Check the IP Address Field: Ensure that you have entered a valid IP address. The format should typically be in the form of `xxx.xxx.xxx.xxx` (e.g., `192.168.1.1`).3. Port Number: Along with the IP address, make sure you also enter the correct port number associated with the proxy server. Common port numbers include `8080`, `3128`, and `1080`, depending on the proxy type.Step 2: Test the Proxy IP1. Use a Proxy Checker: Before entering the IP address into your application, use a proxy checker tool to verify that the IP address is active and functioning. Websites like `whatismyip.com` or dedicated proxy checking tools can help.2. Check for Anonymity: Ensure that the proxy IP is not flagged or blacklisted, as this can lead to connectivity issues.Step 3: Restart Your Application or Device1. Restart the Application: If you have verified that the IP address is correct but still receive the error, try restarting the application you are using. This can help refresh the settings.2. Reboot Your Device: Sometimes, simply rebooting your computer or device can resolve configuration issues.Step 4: Update Proxy Software1. Check for Updates: Ensure that the application or software you are using to configure the proxy is up to date. Outdated software can lead to bugs and errors.2. Reinstall the Application: If the problem persists, consider uninstalling and reinstalling the application to ensure a clean installation.Step 5: Use a Different Proxy Server1. Find a New Proxy: If the current proxy IP address continues to cause issues, consider looking for a different proxy server. Use reliable proxy list websites or services to find active proxies.2. Check Proxy Type: Ensure that the type of proxy (HTTP, SOCKS5, etc.) matches the requirements of your application.Step 6: Disable Other Network Settings1. Check VPN Settings: If you are using a VPN in conjunction with a proxy, it may cause conflicts. Temporarily disable the VPN and see if the error persists.2. Firewall and Antivirus: Sometimes, firewall or antivirus settings can interfere with network configurations. Temporarily disable them to see if they are causing the issue.Step 7: Consult Documentation or Support1. Review Documentation: If you are using a specific application or service, consult the official documentation for guidance on proxy configuration.2. Contact Support: If all else fails, reach out to the support team of the application or service you are using. They may have specific insights into the error and how to resolve it.Preventing Future IssuesTo avoid encountering the "proxy server IP cannot be empty" error in the future, consider the following preventive measures:1. Keep a List of Reliable ProxiesMaintain a list of trusted proxy servers and their IP addresses. This way, you can quickly switch to a different proxy if one becomes inactive.2. Regularly Test ProxiesPeriodically test the proxies you are using to ensure they are still functional. This can help you avoid issues when you need to rely on them.3. Stay Informed About Proxy TypesUnderstanding the different types of proxies and their specific requirements can help you configure them correctly. Familiarize yourself with the nuances of HTTP, SOCKS5, and other proxy types.4. Use Reliable Proxy ServicesIf you frequently use proxies for critical tasks, consider subscribing to a reputable proxy service. Paid services often provide better reliability, speed, and customer support.Encountering the "proxy server IP cannot be empty" error can be a frustrating experience, especially if you rely on proxies for your online activities. However, by following the steps outlined in this article, you can effectively troubleshoot and resolve the issue. Remember to verify your proxy settings, test the IP addresses, and consult documentation or support when needed. With the right approach, you can continue to enjoy the benefits of proxy servers without interruption.